Green Chile Quinoa Burgers

In celebration of the Memorial Day holiday – although a week late, I have a burger recipe for you!  Since I don’t eat beef, naturally it is a veggie burger and this time a quinoa veggie burger. And because I’ve been living in New Mexico for almost 4 years now, I thought it was high time to incorporate some green chiles into more of my recipes.

The quinoa burger is a revamp of a burger I first started making 5 years ago and although I call it a burger, it could be just as easily called a fritter or sorts because I hardly ever eat it on a bun – if it’s not a good bun, it just gets in the way of the deliciousness. Life is too short to waste it on anything less than quality food. (Forget the mass processed foods!)

Green Chile Quinoa Burger

Makes about 8-10 large burgers

Ingredients

rounded cups cooked quinoa (cooking instructions below)

3/4 c shredded cheddar cheese 

2/3 c low-fat cottage cheese

3/4 c roasted, drained, diced green chiles

3 eggs

3 T all purpose flour

2 green onions, including white parts

1/4 tsp black pepper

1/4 tsp ground cumin

1/8 tsp salt

1/8 tsp garlic powder

Non-stick spray or olive oil

Directions

To cook quinoa:

1 cup uncooked quinoa

2 cups water

1/2 teaspoon salt

In a medium saucepan bring the 2 cups water and 1/2 teaspoon salt to a boil over high heat.  Add quinoa and reduce heat to low.  Cover and cook for 18-20 minutes, or until all water is absorbed and the seeds are tender.  Allow to cool for a few minutes. I also regularly use a rice cooker for any whole grain such as quinoa, farro, or barley. Mine cost probably less than $20 and works great!

In a large bowl combine the cooked quinoa, cheddar cheese, cottage cheese, green chile, eggs, flour, green onions, pepper, cumin, salt, and garlic powder.


Heat a frying pan and a couple teaspoons olive oil over medium-low heat.  Mixture will be slightly sticky, so using a 1/4 cup measuring cup, drop mixture into pan and lightly flatten to 1/2 inch thick.  Fry until golden-brown, about 4 minutes on each side.  

*They really tend to fall apart, so don’t try to “form” them.  To help them stay in patty form and not fall apart,  cook them on med-low slowly so they have longer to set-up without burning.  Makes them easier to flip, too.   

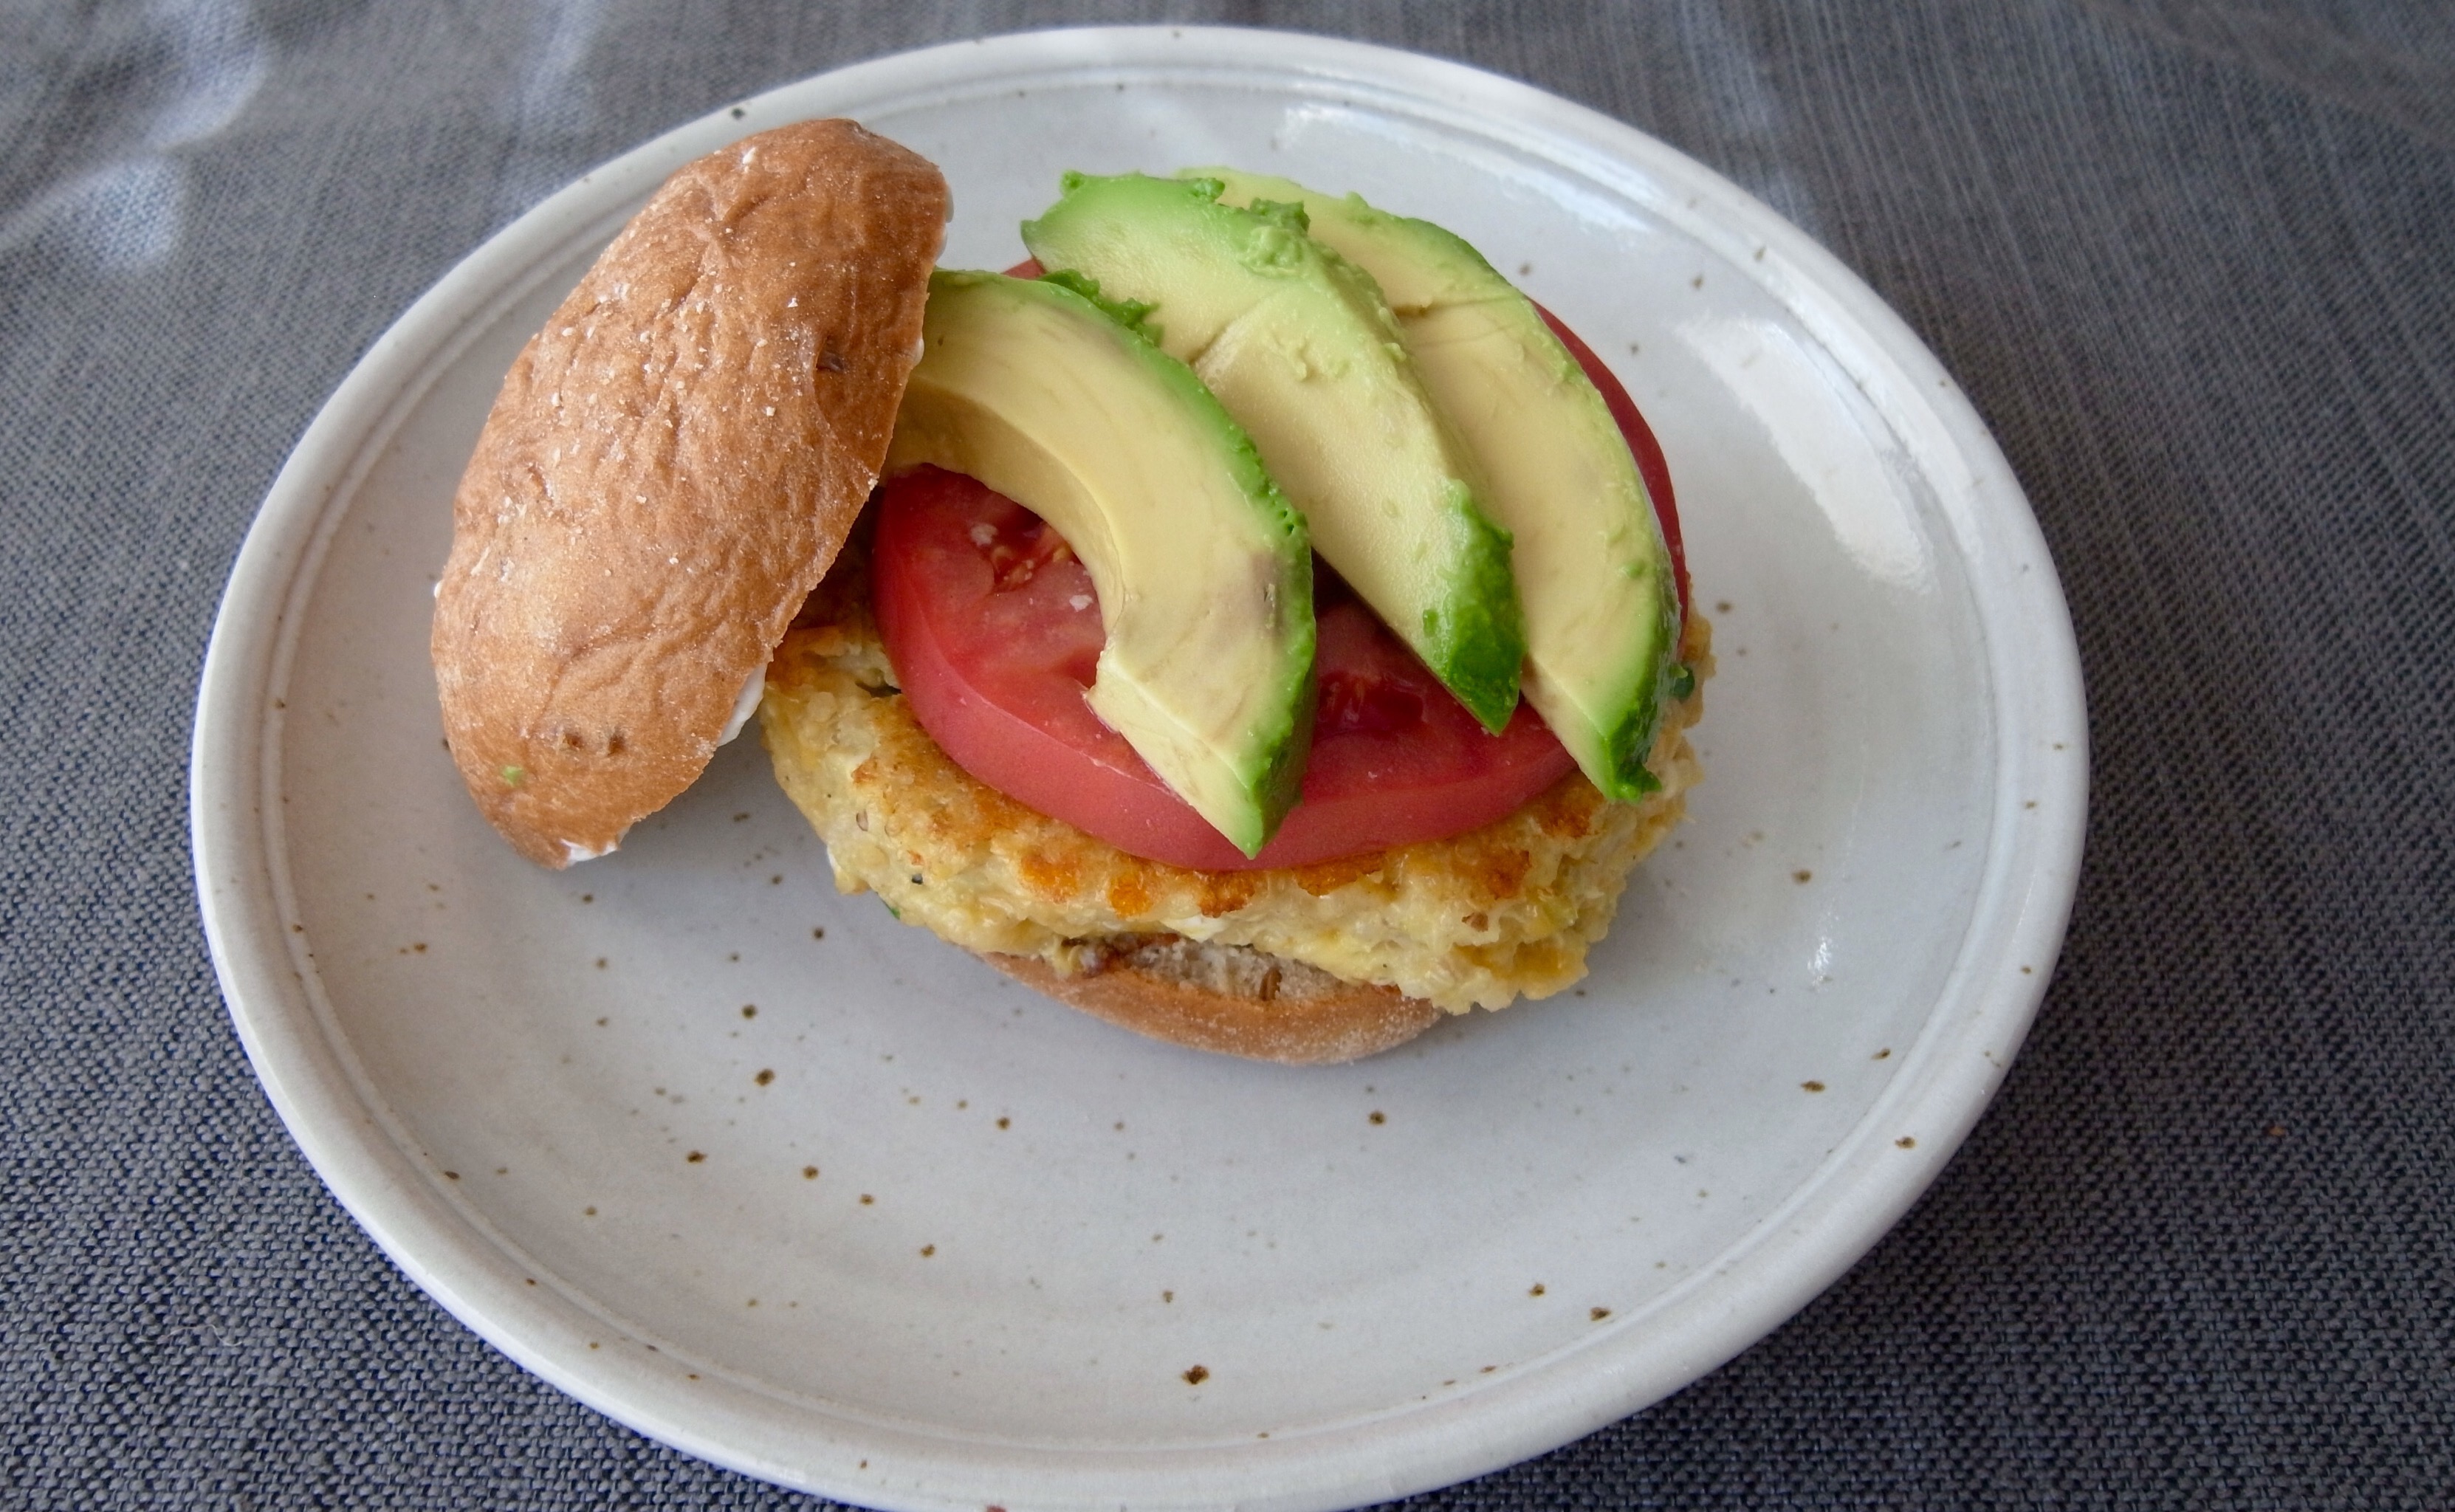
For serving, I like to slice up a few tomatoes and avocado and match with your favorite burger spread.

Enjoy!


Orange and Beet Barley Salad

As part of my work I get to teach cooking class and present different cooking demos to clients – yes I love this part of my job. For an upcoming class I was tasked with using different vinaigrettes and salad dressings. I wanted to show a variety of types of “acids” you can use with a dressing – the most common being vinegar, but adding in a citrus also adds to some complexity and flavor. Rather than dressing only green salads, I also wanted some other type of salad and grain salads with farro and freekeh are pretty popular right now. To change things up I went with barley – yep I know it’s typically thought of in soup, but these are pillows of heaven and should be used more often (I will probably be making a risotto with them in the near future). Since I love beets and oranges together, this salad was born. 

Feel free to get creative with your favorite grain or green for the salad bed. Cooking is all about experimentation! And this is now packed for all of my lunches this week. I’m feeling sort of a winter spring clash with this dish – comforts of winter with the beets and oranges meet the lightness of spring with the arugula. 
 
Orange and Beet Barley Salad

Serves about 4

Ingredients

  • 1 cup dry Italian Barley, farro, or other grain
  • 3 medium oranges
  • 2 large or 3 small beets
  • 2 oz crumbled goat cheese (optional)
  • 6 cups arugula
  • Sliced Almonds (optional)

Dressing

  • ¼ c olive oil
  • ¼ c champagne vinegar (or other light tasting vinegar)
  • ¼ cup orange juice
  • ¼ tsp salt
  • 1T sugar
  • 1T brown sugar

Directions 

  1. Cook dry barley with 3 cups of water until tender, drain any excess water. Stove top or a rice cooker will do the job. Set aside to cool.
  2. Cut the top and bottom off the beets, wrap in foil, and bake in 350F oven for 1 hour. Cool slightly or until cool enough to handle. Using a butter knife, remove loose skin from outside of beets.
  3. For oranges, cut off the top and bottom, then using a sharp knife cut along the sides to remove peel and outer pith. Next cut oranges in half and cut into small chunks.
  4. Mix all dressing ingredients together and shake vigorously in a mason jar or other tightly sealed container. Toss barley and oranges with half dressing to start. 
  5. Dice beets and toss into barley along with oranges just enough to mix – otherwise your salad will be pink. 🙂 
  6. Serve over arugula and sprinkle with crumbled goat cheese. 

*For extra crunch add toasted sliced almonds. 

Enjoy!


Nutty Parsnip Fries

Looking back through some of my old food pics and blog posts I ran across my recipe for parsnip fries and was so mad at myself that I hadn’t made them in 3 years! They’re incredibly delicious. Nutty – slightly crazy – covered with a peanut almond sauce.  I immediately made them, along with a kale salad and crispy tofu. (oh, and wine too – it was that not so great day.)

Ok, right, Ingrid… parsnips as fries?  The answer is most definitely YES.  Parsnips are similar to carrots, but have a little more sugar, so they’ll cook up sweeter.  They are also packed with fiber, vitamin C, and some folate.  I would definitely recommend adding these to your basket next time you’re at the market – especially the farmer’s market come harvest time – yum!  I also made a parsnip gratin way back when – that was also crazy good (covered in cream and not at all conventionally healthy, but so good for the soul).

Nutty Parsnip Fries

Ingredients

  • 1 T olive oil
  • 3 T peanut butter (I like smooth best)
  • 2 T almond butter
  • ~4 large parsnips cut like  fries

Directions

  1. Preheat oven to 375F or 400F (depending on desired crispiness).
  2. Wash, peel, and cut up the parsnips.
  3. In a large bowl, stir together nut butters and oil. Toss the parsips in the butter mixture and coat evenly.
  4. Spread out fried on a large sheet pan, pop in the oven and bake for about 40-50 minutes or until to desired crisp.

Eat and enjoy!  I would say serves 2-4, but really I don’t share at all.  And good luck if they even make it to the table, they’re that addicting!

MAR
21

Nutty Parsnip Fries

Nutty – no not crazy, but covered with a peanut almond sauce.  I made these before and then they were gone so quickly I didn’t get a picture… but have no fear – this time I managed to snag one before everything got gobbled up.

Ok, right, Ingrid… parsnips as fries?  The answer is most definitely YES.  Parsnips are similar to carrots, but have a little more sugar, so they’ll cook up sweeter.  They are also packed with fiber, vitamin C, and some folate.  I would definitely recommend adding these to your basket next time you’re at the market – especially the farmer’s market come harvest time – yum!

Peanut Butter Parsnip Fries

Ingredients
1 T olive oil
3 T peanut butter (smooth or crunchy, I’ve used both)
2 T almond butter
~4 large parsnips cut like fries (you’ll want to make sure you have enough to share… or not)

Directions
Preheat the oven to 375F or 400F (depending on how crispy you like your fries).
Wash, peel, and cut up the parsnips.
In a large bowl, stir together butters and oil.  Toss the parsnips in the nut butter mixture and coat evenly.
Spread out fries on a large sheet pan, pop in the oven and bake for about 40-50 minutes or until desired crisp.

Eat and enjoy!


Bean Stew with Cottage Dumplings

Weather is getting chilly her in Albuquerque – looks like we’re in for an actual winter with clouds and snow! One of the things I like best about mountains is seeing snow on mountains – that steely grey and white. I fall in love every time and remind myself how lucky I am to get that sort of view as an everyday occurrence (at least in the winter). When there’s a nip in the breeze I can hardly wait to start making chili, stew, and other warm comforting dishes. I first made this recipe in my Food Science class while an undergrad studying to become a dietitian. We made a number of different foods but I became obsessed with these dumplings and have been making this for the past 10 years. Thanks, Mrs. James!

 
Nutritionally this is packed with fiber and protein! Beans, corn, cottage cheese and you could definitely make this gluten free if you wanted by swapping out the flour for your favorite alternative. Definitely a must after all of that holiday eating. And these dumplings are so much more hearty and enjoyable than your traditional potato/flour dumpling (although I do like a good gnocchi). 

Bean Stew with Cottage Dumplings

Serves 4-6 large helpings 

Ingredients

Stew:

  • 1 can black bean
  • 1 can kidney bean
  • 1 can great northern bean
  • 1 can diced tomatoes (I used fire roasted for a little more flavor)
  • 1 can tomato sauce
  • Seasonings to taste: chili powder, salt, pepper, tandoori spice (if desired), any other

Dumplings:

  • 2 egg whites
  • ½ c. bread crumbs
  • ½ c. cornmeal
  • ½ c. flour
  • 1 c. shredded cheddar cheese
  • 1-1.5 c. cottage cheese
  • ¾ c. canned corn (dump remaining into stew)

Directions

  1. Heat all of the “stew” ingredients in a large pot until the dish comes to boil, reduce heat and simmer.
  2. Mix the “dumpling” ingredients together in a large bowl, adjust amount with water for right moisture level to hold a ball form. 
  3. Form in to 1 ½ in diameter balls and slide into simmering stew. 
  4. Cook with cover on for 15 minutes, stir gently and rotate dumplings to continuing cooking until they firmly hold a shape.
  5. Serve and enjoy. This is a very flexible recipe, different types beans can be added or spices can be added to the dumplings if desired for more flavor. 


Ok, I’m just going to curl into the corner of my oversized chair with this bowl now…