Full Life Nutrition & Wellness, LLC. I Started a Business!!

I finally bit the bullet and did something I’ve wanted to do for a long time – start my own private practice, Full Life Nutrition & Wellness!! While I focus on nutrition, I incorporate personal training and yoga into the healing and full life living approach.

As my practice continues to expand, the content of this blog will expand as well into more personal reflections, thoughts about various nutrition, fitness, or wholeness topics, and other content readers may find enjoyable or beneficial.

While I still love to cook and bake, to be totally honest, I haven’t had as strong of a passion for it in the past year as I’ve had previously. I find that I need to be authentic to myself. I will still post and share recipes that inspire me, but content is going to be much more varied moving forward.

For more up to date food, stories, personal musings, and cute puppy photos, continue to follow this blog’s and my personal Instagram @sugarspicefitlife.


Peach and Ricotta Crostini

It might be fall, but I’m still obsessing over peaches, especially the ones I can grow in my own back yard! That’s right, we have a fabulous peach tree that grow giant peaches – like the kind you need to grab with two hands. Even though I massively hacked and pruned the tree earlier that year (like I thought nothing would grow back and we’d have this ugly stumpy looking tree), but it still branched out all over the place and we had peaches everywhere – even after C took half off at the start of their growing. We removed some so the others get more nutrients and grow bigger.

FullSizeRender 15

So after having a refrigerator full of peaches, I thought why not do some sort of appetizer with them – I had some left over ricotta and we always have honey, so a super easy snack was born. 🙂

FullSizeRender 16

Peach and Ricotta Crostini

Serves as many as you’d like

Ingredients

  • 1 long baguette
  • Part skim ricotta (it has more protein)
  • Fresh peaches
  • Honey
  • Aged balsamic vinegar

Directions

  1. Slice the baguette on a diagonal and arrange on a parchment lined baking sheet.
  2. Toast baguette slices under the broiler for 30 seconds to a minute or until toasted to desired toastiness.
  3. Slices peaches (can leave skins on or off if you prefer).
  4. Spread each toast with 1-2 T of ricotta.
  5. Arrange peach sliced on toast and drizzle with your choice of honey or balsamic vinegar. If you’re using vinegar, make sure to have the kind that is aged and really think. If it’s not already thick, you can place it in a pot on the stove over a simmer and reduce down to desired syrup consistency.

Eat and enjoy! Preferably with some wine.

R0017131

It’s my 4th summer in this house and each year I’m enjoying the fruit produced more and more – peaches, apples, and figs. After finishing the creation of the patio and fencing around it, I’m also enjoying the backyard more and more – when I’m out there, it really does feel like home. When everything is put away (a wind storm tore down our temporary pergola), I’ll post a video of the space – we have a waterfall too and the sound of falling water is just so relaxing!

50244F8D-F665-4F48-90E2-61E46D6B94D0

Cheers to the ending of summer and the beginning of fall!


Not The Perfect Yogi

IMG_0848

I’ve been teaching yoga for over 3 years and practiced (sometimes intermittently) for 7 years. And for whatever reason within the last year I’ve had thoughts of shame creeping up on me that I wasn’t setting a guiding example for my students – I wasn’t the perfect yogi. I’d compare myself against other teachers in the area and of course the perfect forms you see on Instagram. I would see myself as lacking because I wasn’t doing the handstands or wasn’t (and probably will never be) the most flexible. But yoga is and should be about YOUR PRACTICE and what it means to you. It shouldn’t and doesn’t matter what’s on the outside and how poised you appear to others – it’s about how it makes you feel and the changes happening on the inside.

So I’ve decided to say, f*ck it, I’m human, I love yoga, and I’m going to embrace me. And hopefully that true light will attract other like minded individuals.

10 Ways I’m not the perfect Yogi

…and I’m ok with that.

  1. I don’t do yoga for hours a day or even 20 minutes all days.
  2. My flexibility has and always will be a work in progress.
  3. I’m not vegan or vegetarian. Although I gravitate towards more plant based options, I know that sometimes I like a piece of chicken or pulled pork.
  4. I don’t only eat organic – because sometimes it’s a waste of money. Seriously, organic sugar substitute? Just eat the sugar. Eat whole foods and limit the processed crap.
  5. I don’t always have positive thoughts about people.
  6. I’m afraid of handstands and going upside down, but I’m working on it.
  7. I like wine & yoga classes – they’re fantastic, and let’s be honest, no one is there for the full on yoga experience. So let’s just stop discussing how it’s not true yoga because alcohol won’t help your center or your breath.
  8. I love doing yoga to jazz, pop, and club dance music. Flowing to a beat.
  9. I’m not 11% body fat and never will be again – mainly because that was a very, very unhealthy time for my body. (FYI – that percentage is low for women).
  10. I don’t meditate daily or sometimes even weekly, but it is one of my goals – someday, eventually.

Bottom line. Be who you are. Don’t try to fit a certain mold or stereotype – you end up a poor imitation and feel awful in the process.

IMG_2161

I try to keep my own practice and my classes true to who I am and how the body feels in that place and time – sometimes I completely throw out what I initially set out for my class because moving into this feels better than moving into that in the moment.

Shame can be a natural/normal feeling that creeps into various parts of our life and can in some cases take years to work through. Especially when we’re bombarded with the picture perfect images on Facebook, Instagram, and even blogs! The most important piece to remember is photos are staged and all we’re seeing is the highlight reel. The moments in between the highlights are where real (not reel) life happens and that is just as beautiful (mess, pain, work, and all).

Namaste y’all.

Peace and lots of love,

Ingrid


Raspberry and Whipped Hazelnut Tart

Has anyone been watching the Great British Baking Show or the Great British Bake Off if you’re from the UK? I know we’re sort of behind on the times, but Netflix just released their first season of it last year (which was actually season/series 4?) and now they’ve added 2 & 3 (or 5 &6).  C and I did some binge watching and after finishing what Netflix had, sort of freaked out that there were three seasons prior to what we’d seen and had to get them to watch. Well…. to wrap things up, if you haven’t seen it, watch it now. And their opening cake was somewhat of an inspiration for the flavors of this tart.

A couple weeks ago I made hazelnut butter. And while it was really delicious on it’s own on toast, etc. I thought, what if it was a pie or fake-ish cheesecake? And Ta-Da! Idea born.

While the filling was a no-brainer for me with the tofu – since the same style works so well with peanut butter dip, I had a more difficult time trying to decide whether to do a fully “raw” tart (which you could totally do with this crust) or something more like a short crust pastry tart. I opted to go with the short crust pastry type and used inspiration from Sally’s Baking Addiction to make a pretty standard nutty pastry crust.

Raspberry and Whipped Hazelnut Tart

Serves 12-16

Ingredients

Toasted Hazelnut Crust

  • 3/4 c raw hazelnuts
  • 1 c all-purpose flour (or flour of choice)
  • 2 T sugar
  • 1/2 tsp salt
  • 1/2 c butter, cold and cubed
  • 3 T ice water

Whipped Hazelnut Filling

  • 1 ½ c creamy hazelnut butter
  • 14 oz firm tofu (1 package)
  • 3 T sugar or to taste
  • 1 tsp vanilla
  • pinch salt
  • 3-4 T vanilla soy milk (or other milk of choice)

Raspberry Sauce

  • 1 c organic raspberry jam
  • 2 T water
  • 1 c fresh raspberries

Directions

  1. If making your own hazelnut butter, I suggest you do that first before moving on to the rest of the recipe. Store bought is also fine, but difficult to find, and homemade is just that much better!
  2. Preheat the oven to 350°F. Spread hazelnuts out onto a foil or parchment lined baking sheet. Toast until slightly darkened, about 7 minutes. Watch these like a hawk! Allow to cool down for 5 minutes. Leave oven on to bake the crust.
  3. To remove the skins of the hazelnuts (they’re kind of bitter), lay a clean tea towel on your counter, and scoop the hot hazelnuts, into a pile in the center of the towel (take care due to the high heat of the nuts). Bring the four corners of the tea towel together and gather it up in one hand, so that all of your hazelnuts are scooped up in the bottom of the tea towel. Using your other hand, squish the bottom and the sides of the tea towel so that all the hazelnuts are rubbing up against each other. Do this for a couple minutes until most of the skins are removed.
  4. Separate out the skins from the nuts. I use a slotted serving spoon – it’s big enough to get more than a few nuts at a time and the holes are small enough that the nuts won’t fall through but the skins will.
  5. For the crust:Using a food processor, pulse the toasted hazelnuts, the flour, sugar, and salt together until it reaches the consistency of coarse meal. Add the cubes of cold butter and pulse until the mixture turns into pea-sized crumbs. I used frozen butter since I was working in a warm kitchen – you don’t want it to get too soft.
  6. Transfer mixture to a large bowl. Using a rubber spatula or wooden spoon, slowly stir in 3 Tablespoons of ice water. You only want to add enough water to bring the dough somewhat together. Using floured fingers or the bottom of a flat and lightly floured measuring cup, press the dough evenly into a 9 inch tart or pie pan. (If you’re making smaller tarts, depending on the number of pans you have… I had three smaller spring form pans, reduce the recipe by one quarter.) You want it extremely tight in the pan. You’ll need to use baking beans or pie weights for the next step, so line the crust with aluminum foil or parchment paper and add pie weights or dry baking beans.
  7. Bake at 350F (with pie weights) for 18-20 minutes. Remove from the oven and place on a wire rack so it can slightly cool as you prepare the filling.
  8. For the filling: In a clean food processor, blend together the hazelnut butter, tofu (drained), sugar, vanilla, salt, and soy milk until it comes to a super creamy and fluffy consistency.
  9. Spoon filling into tart crust, creating a slight ridge around the outside that can hold in the filling, and place in refrigerator while preparing the topping.
  10. For the sauce: Mix the raspberry jam/preserves with 1-2 T water. Using a wire mesh sieve, press the mixture into the mesh to collect the seedless topping below. (You can also choose to make your our raspberry jam, I just find it to be a little bit of a time saver to by your own and tweak it.)
  11. Spread the raspberry sauce over the top of the tart, staying within the “dam”. Place in tart in refrigerator to chill and set – 4 hours or overnight. When ready to serve, line the edge of the tart with raspberries (bottoms up).

This might be my heaven. Luckily a few bites are already pretty filling, so it’s easily shared. 🙂

After making this amazing tart, I find out C doesn’t like hazelnuts. WHAT!? What crazy person doesn’t like hazelnuts? So not wanting to eat the equivalent of an entire tart by myself, I brought two of the small tarts to work. And they were a complete hit! That creamy nutty filling, the tart raspberries, and crunchy crust is what my summer dreams are made of.

Even though the recipe looks long and maybe a bit overwhelming, I promise that if done in steps, it’s super easy and almost completely fool proof.

Tofu is one of my favorite additions to all things creamy that need some sort of structure. What are some of your favorite “hidden” ingredients?


Greek Farro Salad

While Greece has made its way into the news within the last 8 years for aspects they’d prefer to move past, it will always be a place that for me is filled with friendly, welcoming people, thousands of years of history, small towns tucked into mountains, and my first real taste of adventure. And I will always remember it and be thankful to this place for turning my fear of food completely around. I realized here what good, fresh food actually tastes like and to not fear gaining a few pounds because life is more important than the size of the waist band on your jeans. In the three months I spent there in 2008, I learned a lot about food – but most importantly that it doesn’t need to be extravagant to be good.

Enter the Greek salad.

Although I like to experiment with making new foods, I find that I sort of stay in a recurring pattern for the lunches I take to work. If I can, I try to make it revolve around a salad or vegetable of some kind. Ideally a salad with a whole lot of protein and healthy fats.

La Pepita Salad usually enters the rotation every other month or so, then occasionally a roasted vegetable and tortellini salad, and then I tended to have a Greek themed salad about every 2-3 months. For the longest time I kept it like a pasta salad with orzo, but after finding whole wheat orzo became too challenging, I began to branch into other similar shaped grains. I landed on farro being the best option. It’s full of fiber and more protein than orzo, and has a great chewy texture while the orzo used to get really mushy soaking up all of the dressing.

Greek Farro Salad

Makes 4 large portions or 6 smaller

Ingredients

  • 1 cup farro, cooked
  • 1 can/15oz garbanzo beans, rinsed
  • 1 large cucumber, quartered and sliced
  • 3 small or 2 medium tomatoes, deseeded and roughly chopped
  • 4oz feta, crumbled
  • 10oz can sliced black olives, drained
  • 1/2 red onion (optional)

Vinaigrette

  • 1/3 c red wine vinegar
  • 1/2 c olive oil
  • 1/2 tsp dijon mustard
  • 1/2 tsp dried basil
  • 1/2 tsp dried oregano
  • Salt and pepper to taste

Directions

  1. Cook the farro – in a large pot, bring water and a pinch of salt to a boil (it doesn’t matter the amount as long as it is at least 2 times as much farro). Add in one cup of farro and cook until farro is tender yet chewy. Most grains will not split open.
  2. While the farro is cooking,  wash and chop the vegetables and place in a large mixing bowl.
  3. Drain excess water and rinse farro under cold water. Dump into the mixing bowl with the rest of the salad ingredients.
  4. Toss to combine.
  5. In a mason jar or other sealable container, shake up the vinaigrette ingredients until well combined.
  6. Pour about half of the dressing over the salad and mix together. Add in as much of the rest of the dressing as you would like to suit your tastes.
  7. The salad holds well for a few days and potentially longer if you dress is on the day you will be eating it.

And although I like black olives, if you want a bit more authenticity, go for some kalamata. For ease of eating lunch, I go with what is already pitted.

The flavors definitely bring me back to those vegetable salads I ate while studying there almost 10 years ago. (Has it already been that long!?) Contrary to what you will see on Greek restaurant menus here in the US, the typical salads did not have lettuce – unless you ordered a green salad which was different than the regular salad of quartered tomatoes, red onions, cucumber, and a block of feta on top.

2008_0223(013)

The authentic Greek Salad – and dinning alfresco is imperative.

Most often if you want the traditional style someplace other than Greece, they may call it a village salad or something to that effect. But whatever you decide to do, get as close to the farm fresh vegetables as you can get – they will make all of the difference.

2008_0214(008)

Greece, I love you and some day I’ll be back. And until that time, I’ll try to recreate some of my favorites to the best of my ability.

What are some favorite foods from your travels and have you tried to re-create them?


Creamy Roasted Hazelnut Butter

About five or six years back, I was in a Middle East specialty grocery store and found a jar of hazelnut butter.  Not just the normal Nutella themed chocolate and hazelnut, but straight up hazelnut butter and it was delicious! Since that time I have yet to locate it in another grocery store and I’m too lazy and/or cheap to buy it online when it’s so easy to make!

Basically, so stupidly easy I’m kicking myself for not doing it sooner, but to be fair, I was on a regular old peanut butter kick and then cashew butter – both also delicious.

Creamy Hazelnut Butter

Makes about 2 cups

Ingredients

  • 1 pound raw hazelnuts
  • 1/2 tsp salt
  • 1 T sugar, honey, or agave
  • 1/2 tsp vanilla

Directions

  1. Preheat over to 350F.
  2. Arrange hazelnuts on a foil lined baking tray and roast in the over for 7-10 minutes or until a light golden brown.
  3. Let cool just slightly and transfer to a clean towel. To remove the skins of the hazelnuts (they’re kind of bitter), scoop the hot hazelnuts into a pile in the center of the towel (take care due to the high heat of the nuts). Bring the four corners of the tea towel together and gather it up in one hand, so that all of your hazelnuts are scooped up in the bottom of the tea towel. Using your other hand, squish the bottom and the sides of the tea towel so that all the hazelnuts are rubbing up against each other. Do this for a couple minutes until most of the skins are removed.
  4. Separate out the skins from the nuts. I use a slotted serving spoon – it’s big enough to get more than a few nuts at a time and the holes are small enough that the nuts won’t fall through but the skins will.
  5. Place warm nuts* in a food processor and grind until smooth. Add in vanilla, salt, and sweetener (if desired) and continue to blend until a smooth butter is formed – yes, it should be kind of runny. If it hasn’t yet reached that consistency, just be patient, it will get there.

*Warm nuts tend to work a little better and faster by making the oil more available during the processing.

You can keep it stored in an air tight container. I like mason jars because you can easily see through them and they store about 2 cups perfectly.

My hazelnut butter is a little on the darker side because I toasted the nuts just a bit extra. If you like you’re lighter, just watch very closely and removed when they’ve gathered just a hint of golden. You can also make the butter raw, but won’t be able to remove the skins. Just a bit of trade offs. I also added a touch of sweetness to mine because I was trying to get as close as possible to the flavor I found in that Middle East grocery (which was akin to the chocolate hazelnut without the chocolate, but still some sweetness).

Stick around for a to-die-for dessert coming to the blog in the next couple of weeks that features this fantastic spread – hazelnutty goodness.

What are your favorite nuts butters? Do you stick with the classic peanut butter or almond or branch out into walnut, pecan, cashew, and hazelnut?


Chocolate Chia Seed Pudding

A few weeks back, we were discussing different recipes for chia seed pudding. I had tried to make it in the past with almond milk, but the seeds always seemed to sink and clump up on the bottom. A co-worker suggested trying coconut milk if I wasn’t able to drink regular cow’s milk, so I did and now I’m hooked on the stuff! My favorite is plain with lemon curd (maybe I’ll share that in the future as well).

For today, I branched out a bit from the 3 Pleasures Dessert theme (dark chocolate, nuts, and fruit) to drop the nuts and do seeds instead – chia seeds! Chia seeds have fiber, protein, and most importantly healthy omega-3 fatty acids. The cocoa provides a rich/somewhat bitter chocolate taste that can satisfy just about any craving.

R0016994

If you’re looking for a more mousse like consistency and to have it ready in less time than overnight, you can put it into a blender. 🙂

R0016996

Chocolate Chia Seed Pudding

Serves 2 when sharing

Ingredients

  • 1 c plain coconut milk, room temp or warm works best
  • 1/4 c chia seeds
  • 1/4 c cocoa powder
  • 1 T granulated sugar
  • 1 tsp vanilla, optional
  • Favorite fruit to serve – I recommend raspberries or strawberries

Directions

  1. Measure all ingredients, except fruit, into a mason jar.
  2. Shake well for about a minute. It will be easier to mix in the cocoa powder without clumping if the coconut milk is warm or room temperature.
  3. Let sit a few minutes and shake a second time if seeds seem to settle to the bottom too quickly.
  4. Place in refrigerator overnight to allow seeds to “gel” and create a pudding like texture.
  5. Serve with fresh berries.

*The texture will still have the seeds since they don’t dissolve, but if a creamy texture is paramount in your pudding, I suggest the blender method – blend all ingredients instead of shaking and let sit a few hours in the refrigerator or until mixture is desired thickness.

R0016999

Have you tried chia seed pudding or using chia seeds in smoothies or over oats?


Sophisticated Your Chocolate – Sweet and Savory Chocolates

Have you heard about the Three Pleasures – a dessert challenge that circled in 2016 challenging chefs to create healthier dessert options using the Three Pleasures – dark chocolate, fruit, and nuts? For a cooking demo I’m working on we’re using these three ingredients as a healthier dessert option for diabetics – and if you just want to be healthier in general while satisfying your sweet tooth. While thinking of dried fruit and nut options for a chocolate bark I decided to get a little crazy and thought – what if I add herbs?!

r0016946

In my humble opinion, the herbs were a genius way to go. Although I do always enjoy the peanut butter chocolate combo and find it hard to resist chocolate and caramel, the herbs have me thinking in a whole new way.

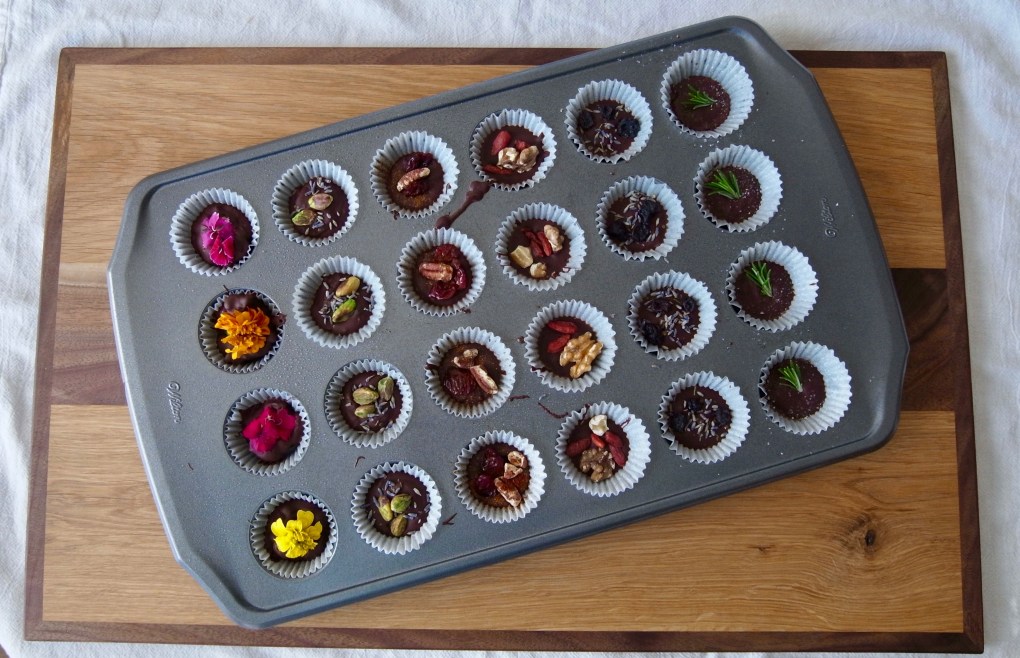
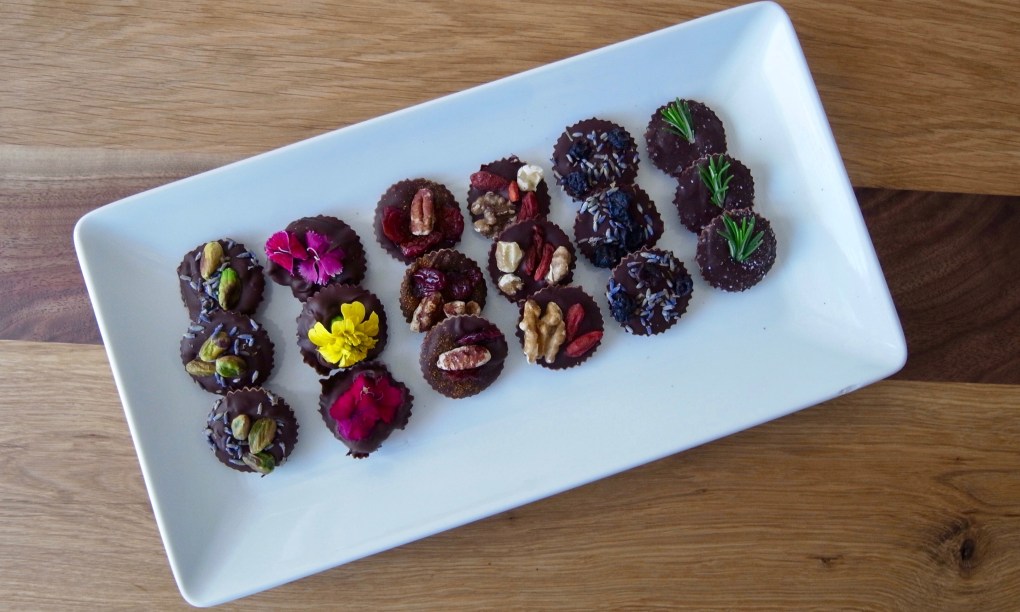
Since I only made 4 of each flavor (I can’t be tied down with only one flavor and 24 chocolates – I need variety!), they aren’t exact recipes, but I can tell you what you’ll need for each along with the base of: a dark chocolate of at least 60% cocoa, bitter sweet will also work; mini muffin tins; mini muffin papers; and non-stick spray.

I chopped and melted ~12oz of chocolate over a make-shift double boiler – glass bowl set over boiling/simmering water. Melt until just melted – don’t sit there and stir the chocolate for too long or it will eventually start to separate out and become hard because there isn’t enough fat to prevent over working. I then mixed about 2oz of chocolate with each of the described combinations. Spray your muffin paper with the non-stick spray before putting in the chocolate – it just makes them easier to remove. Let it set and then enjoy.

fullsizerender-10

Walnut and goji berry – no additional spices, just toasted walnuts and gofi berries. I started you off with and easy one.

fullsizerender-8

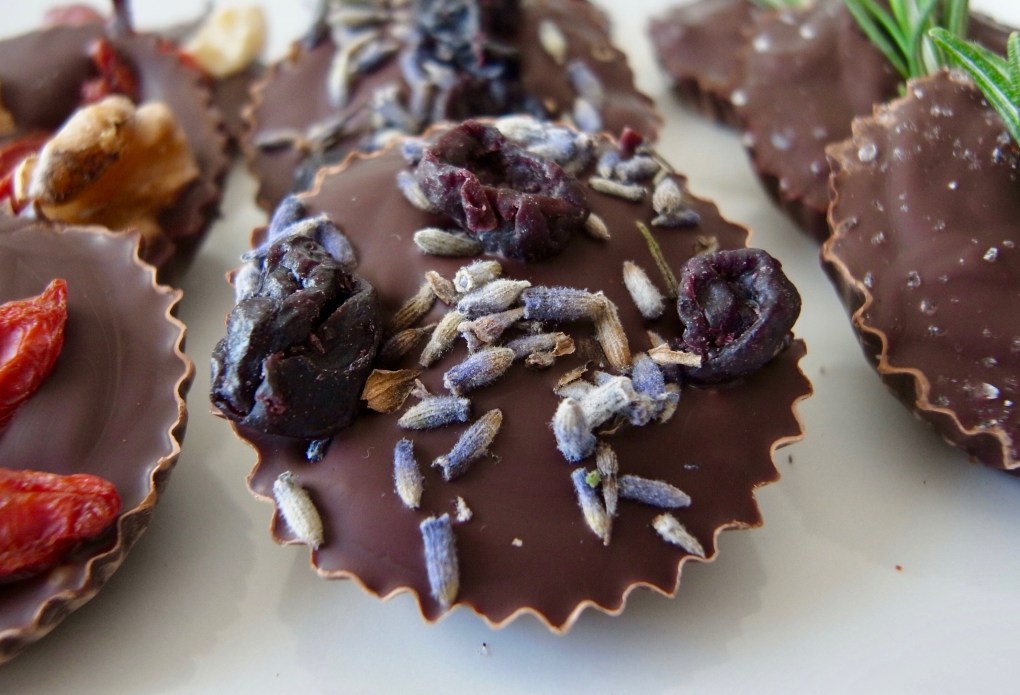
Lavender Blueberry – crush 1/2 tsp of edible lavender and mix in with chocolate – sprinkle top with additional lavender and top with dried blueberries. Crushing brings out more of the oils from the lavender along with the flavor (better than finely mincing).

fullsizerender-6

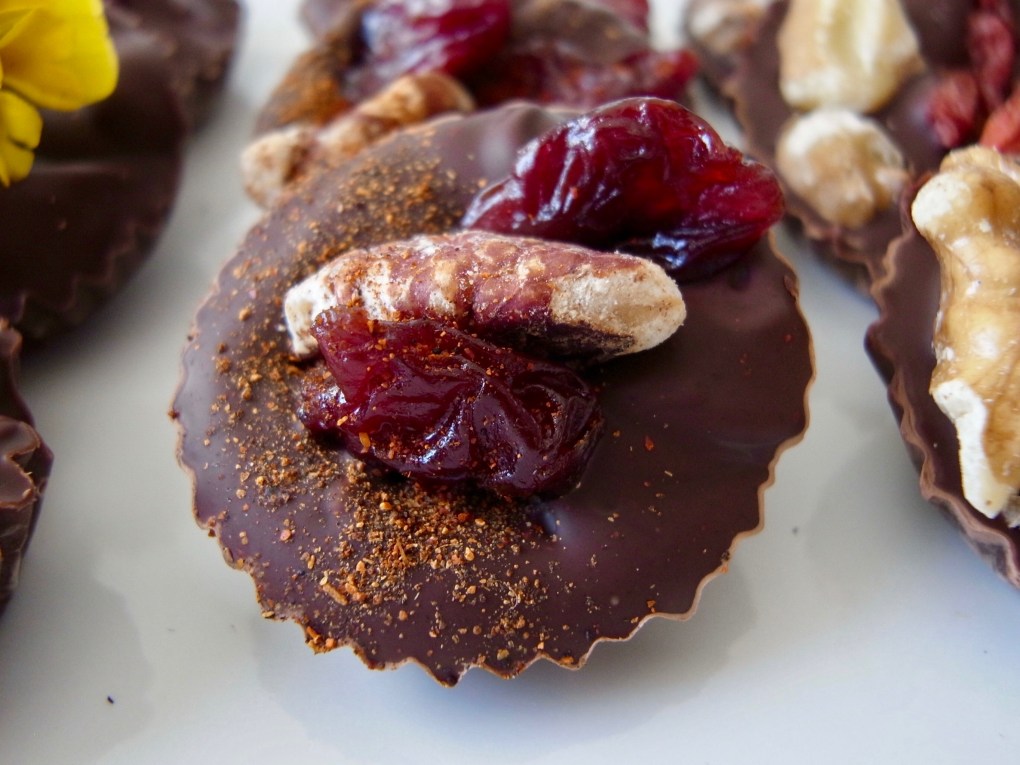
Chili Cherry Pecan – mix chili powder in with chocolate, about 1/4 tsp (or as spicy as you like), top with dried cherries, pecans, and dusting of additional chili powder.

fullsizerender-5

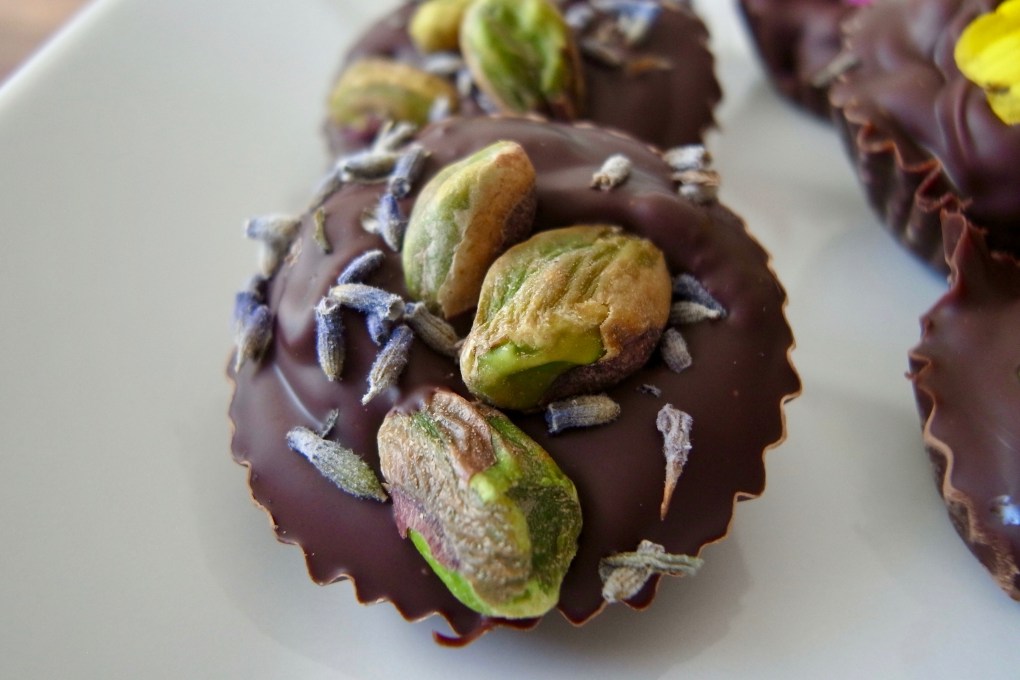
Lavender Thyme Pistachio – crush about 1/4 tsp edible/culinary grade lavender, finely mince 1/4 tsp fresh thyme, and mix with chocolate. Top with toasted pistachios and sprinkle with additional lavender. I’m also lucky that the Los Poblanos lavender farm is only a few miles away so I can get some culinary grade lavender at their store too. 🙂

fullsizerender-4

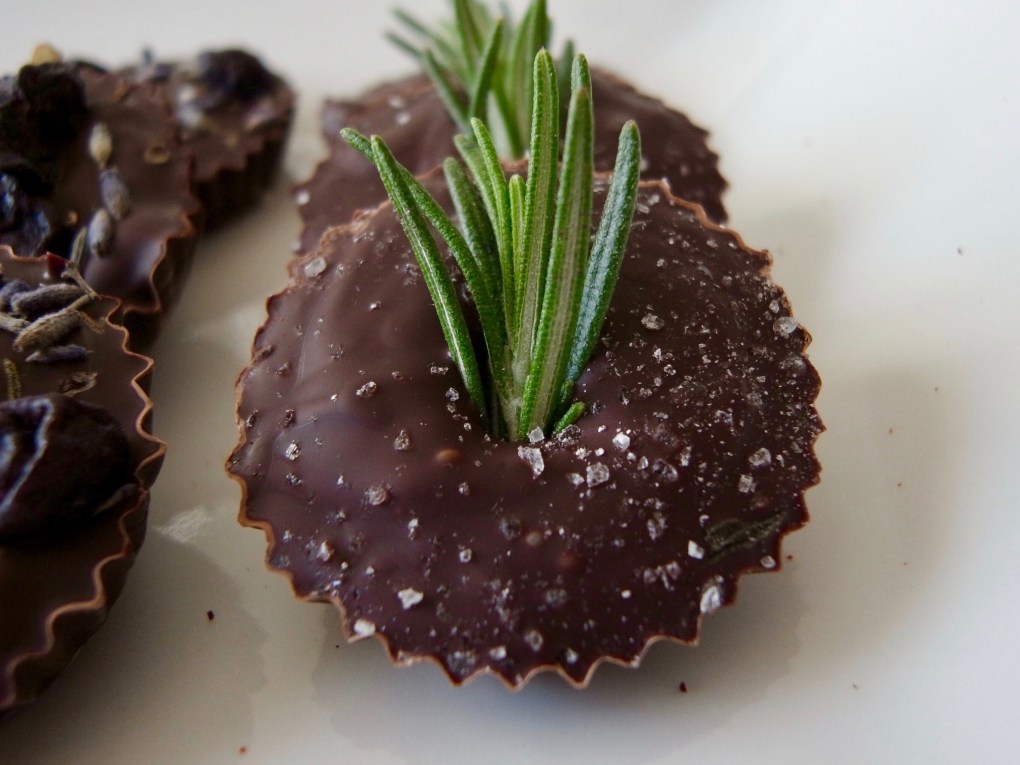
Rosemary Sea Salt – mince ~1/4-1/2 tsp of fresh rosemary and mix in with chocolate. Sprinkle with sea salt and place a sprig of rosemary for decoration – it’s a little too strong to eat with it, but looks pretty.

fullsizerender-3

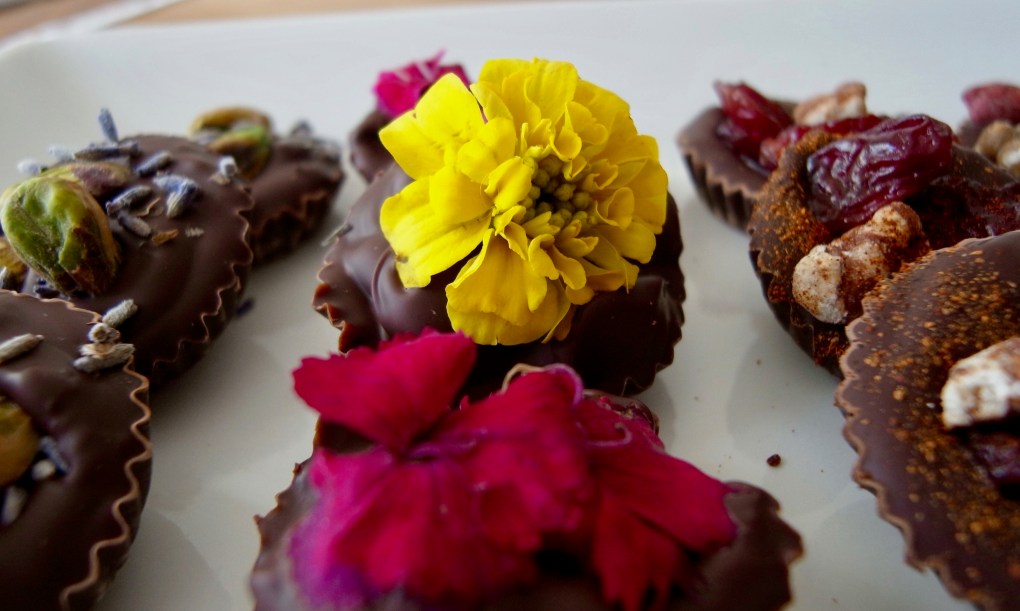
Last but definitely not least – I tried my hand with some edible flower over a cluster of dried cherries, blueberries, and pecans. The flower helps to hide the lumpy shape of the cluster.

fullsizerender-9

Each chocolate is perfectly portioned for a great after dinner treat and the jazzed up flavors do make me feel more sophisticated. Each chocolate is about 1/2 oz of chocolate. Aren’t they gorgeous looking! Although I think they’re all delicious, I think my favorite at this time might be the lavender and blueberry. It just makes me think of the coming spring and makes me happy.

What are some of your favorite more “exotic” chocolate flavors? Have you ever tried to mix your own flavors at home?