Deconstructed Blood Orange Parfait with Toasted Almonds and Coconut

I really have no idea where this recipe originated, but one of my coworkers did a cooking demo with this recipe and I just had to try and recreate it at home. She made it as a dessert, but it could just as easily be one of the most delicious breakfast options. Although winter is winding to and end, at least here in Albuquerque where it’s been 70 degrees for the last week, I’m still obsessed with blood oranges whenever I see them – cocktails, sangria, and now a probably healthier option – a deconstructed parfait.


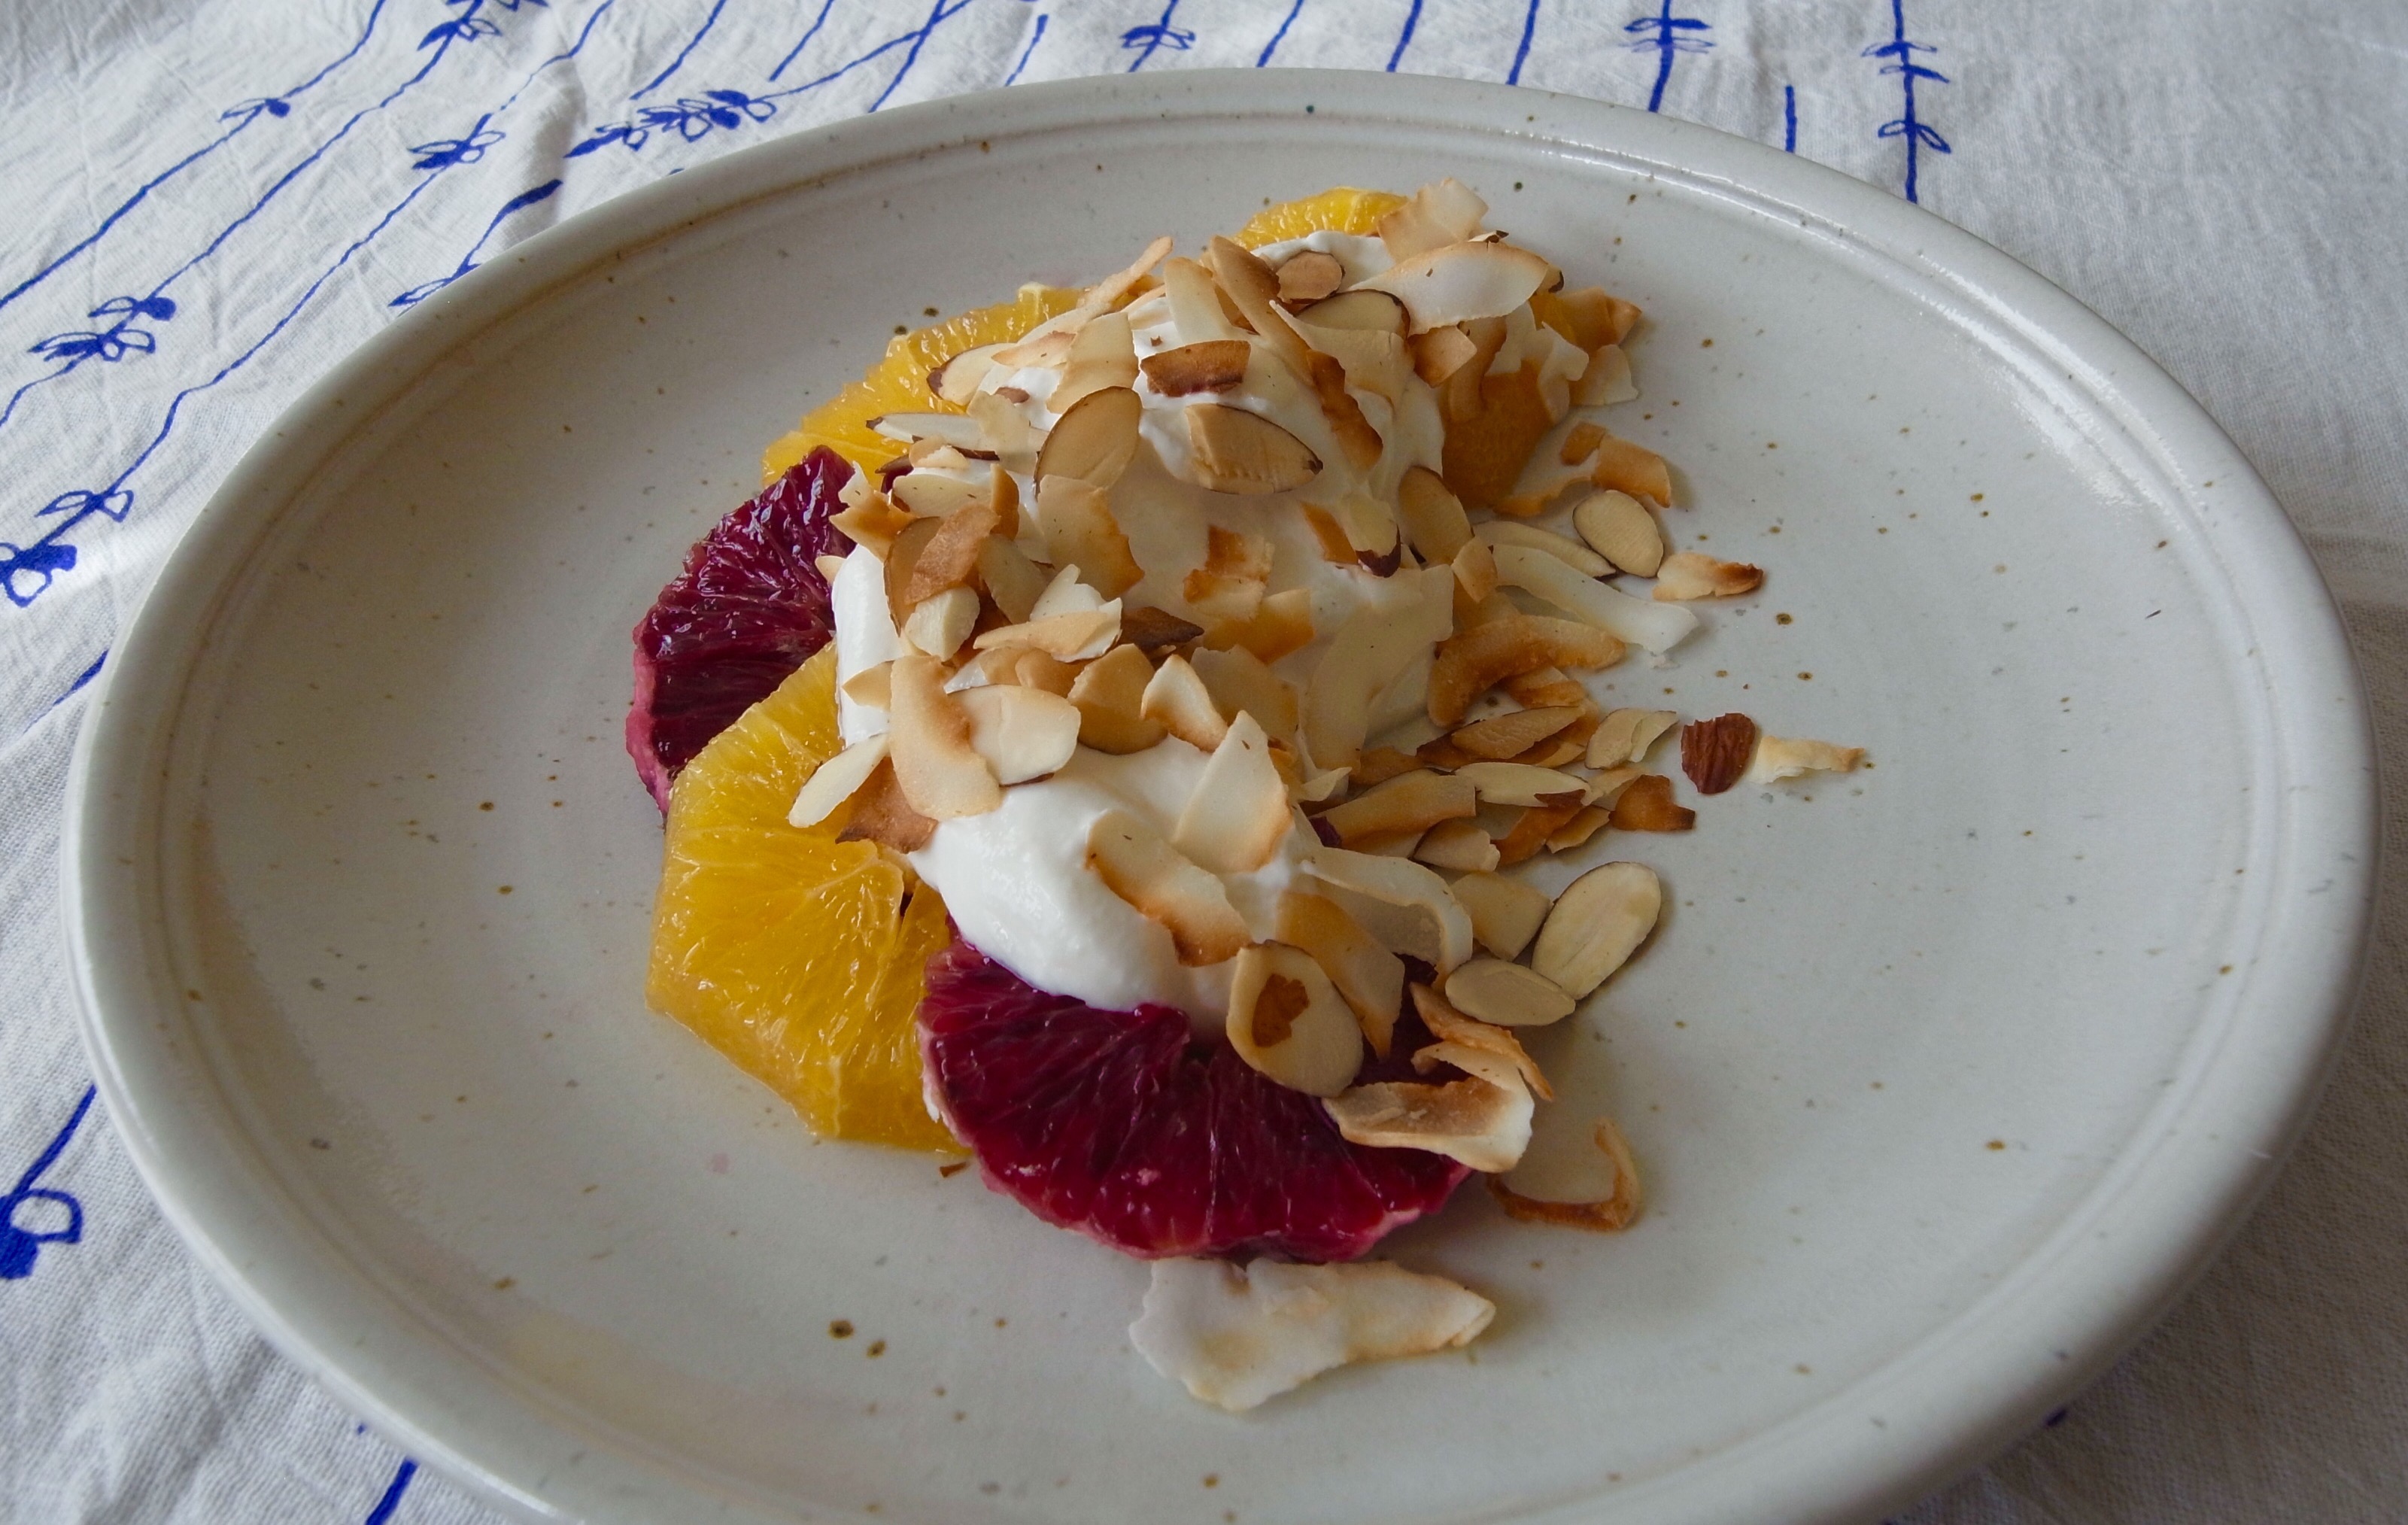
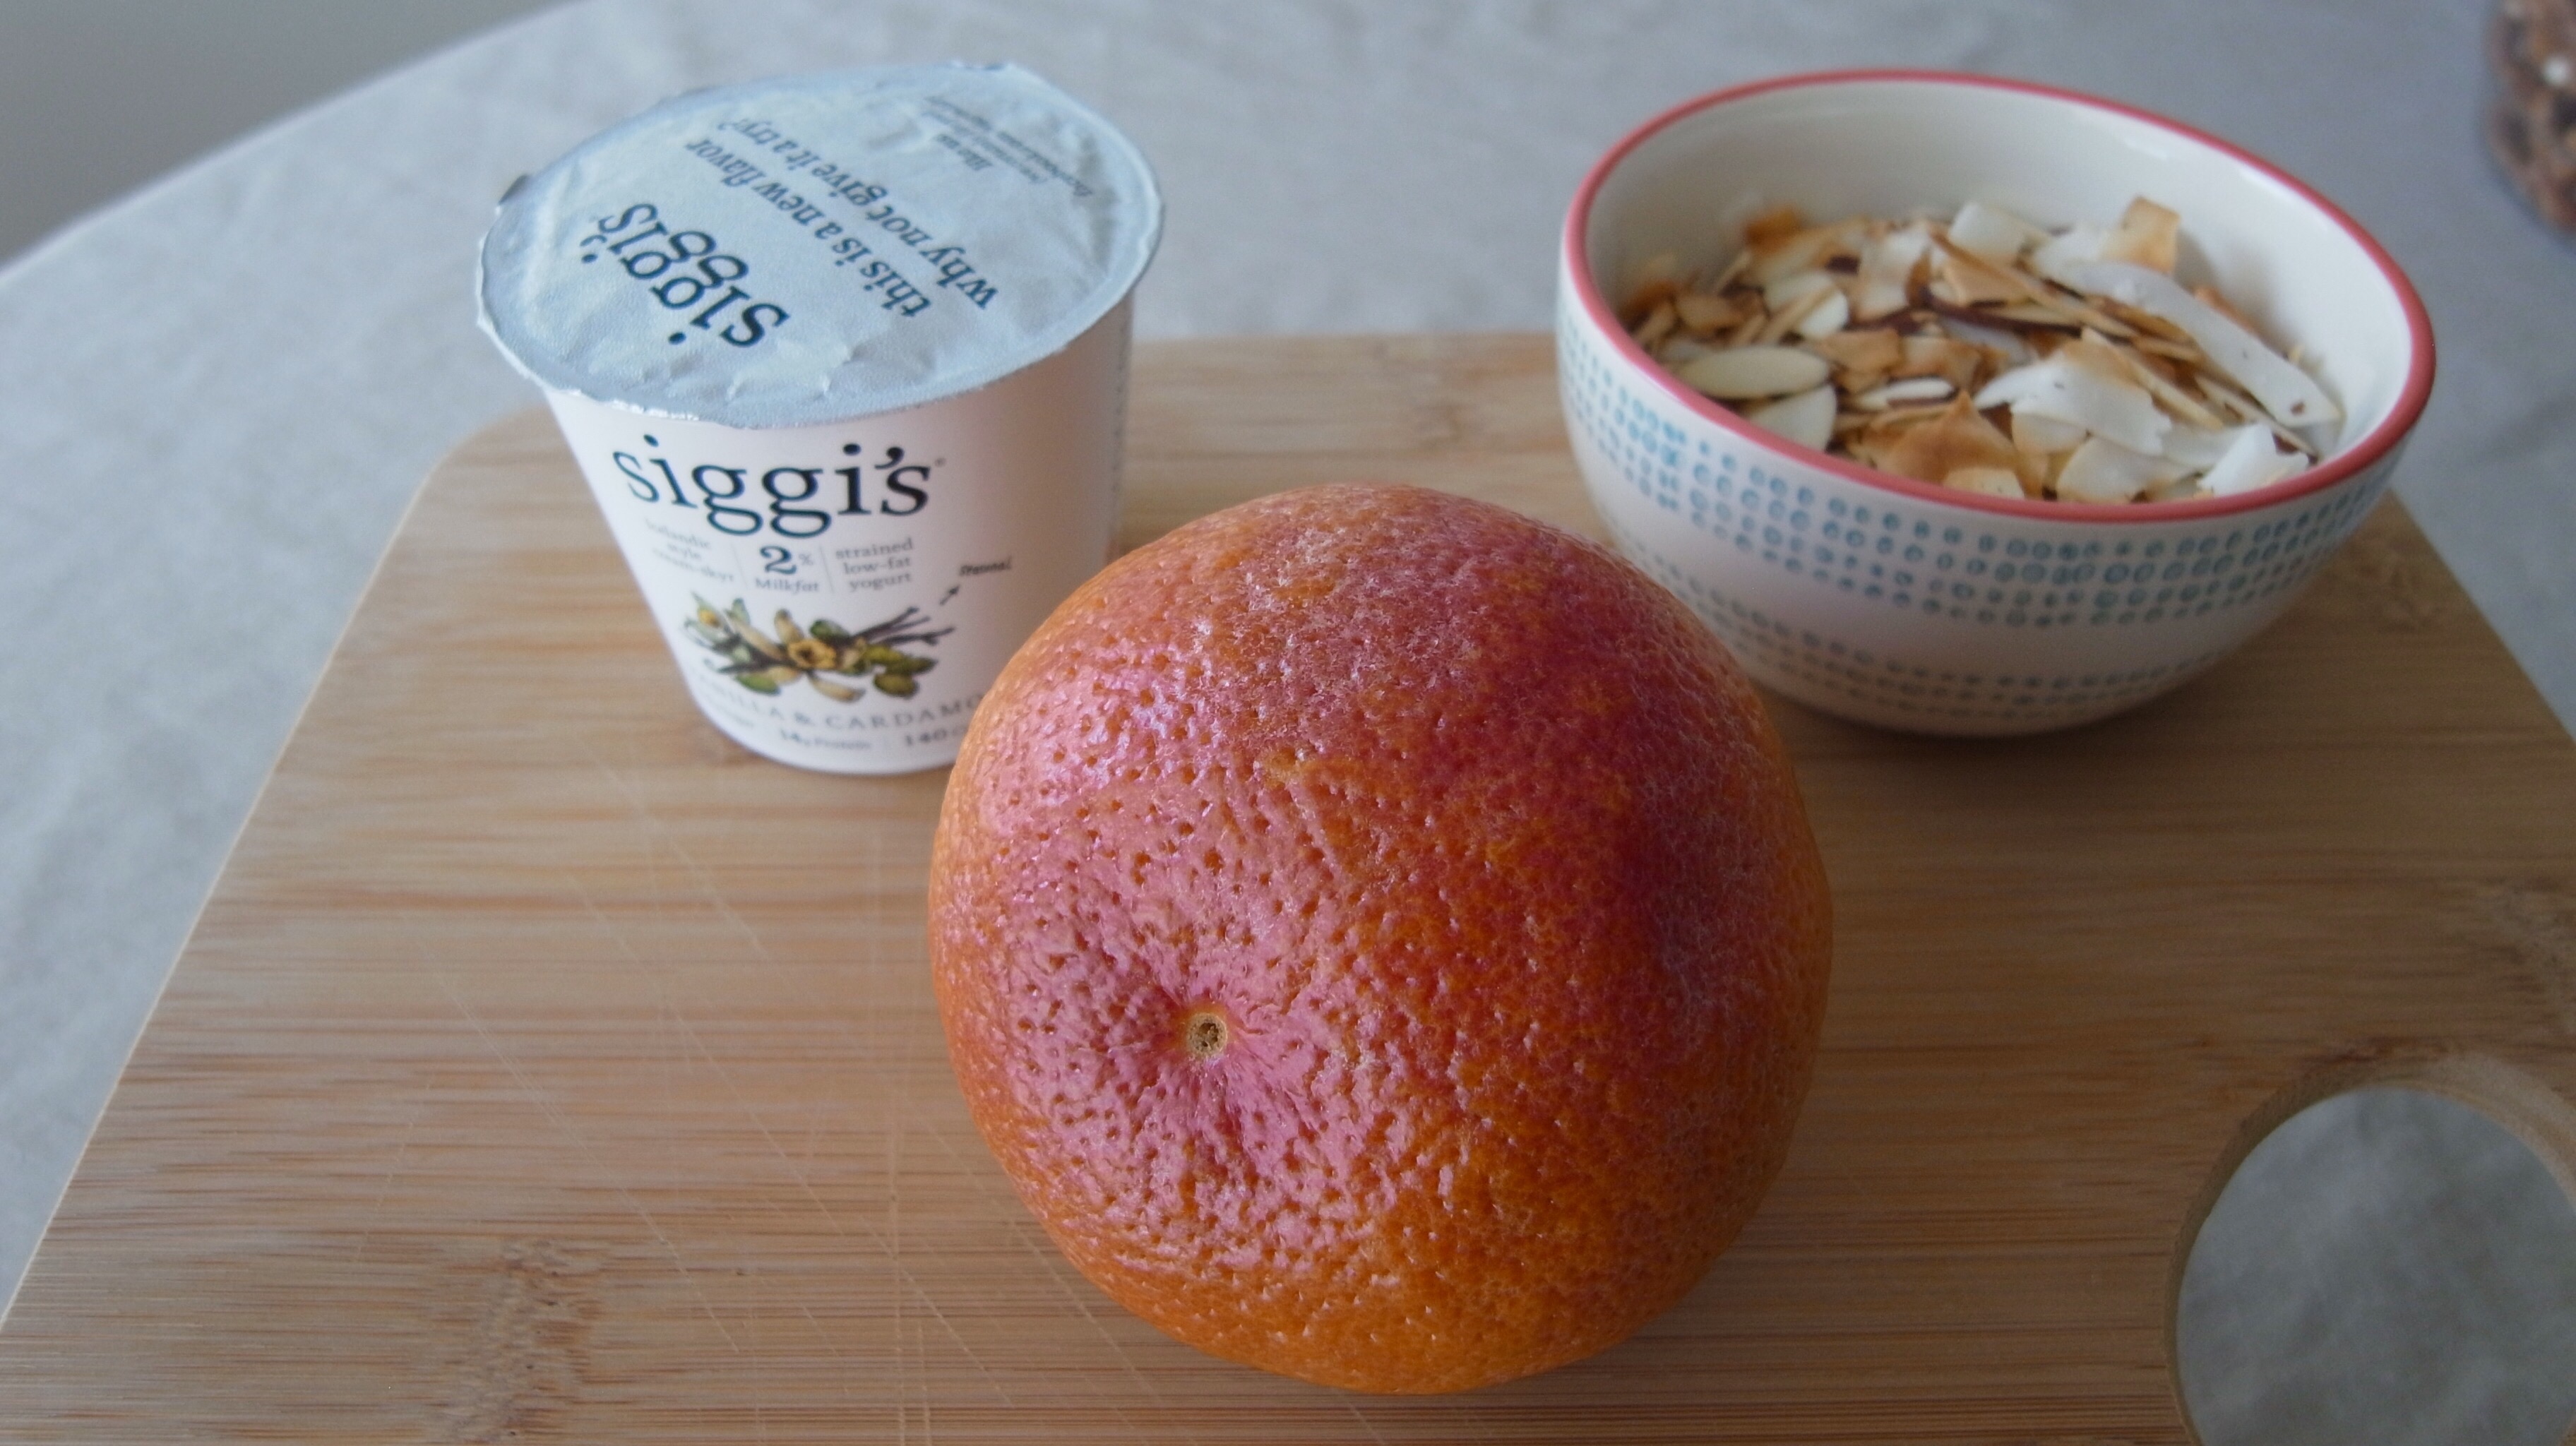
While impulse shopping at Sprouts, I found a new vanilla yogurt with cardamom, but for the purpose of this recipe you can make your own from scratch. 🙂 And just be warned, the smell of toasting coconut and almonds will bring all of your pets and SOs into the kitchen. Just in case you were thinking of not sharing.


Deconstructed Blood Orange Parfait with Toasted Almond and Coconut

Serves 2 or 1 very generously 

Ingredients

  • 1 blood orange
  • 1 cara cara or other navel orange
  • 1/4 cup large coconut flakes
  • 1/4 cup slivered almonds
  • 1 cup vanilla yogurt or split with half plain yogurt for diminished sweetness
  • Pinch Cardamom

Directions

  1. Add almond and coconut flakes to a dry skillet and toast on medium heat until lightly brown, tossing and stirring often to avoid burning. You can also toast in a 350F oven for 10 minutes (or until golden) on a flat baking sheet. Let cool.
  2. To cut oranges, slice off the bottom and top of the orange, then slice around the side with a sharp knife to remove any pith. Slice into quarter inch slices. Arrange oranges on plate, alternating for color contrast.
  3. In a small bowl, whip vanilla yogurt (or plain with a dash of vanilla and honey) with a pinch of cardamom.
  4. Spoon yogurt over oranges and sprinkle with coconut and almonds.


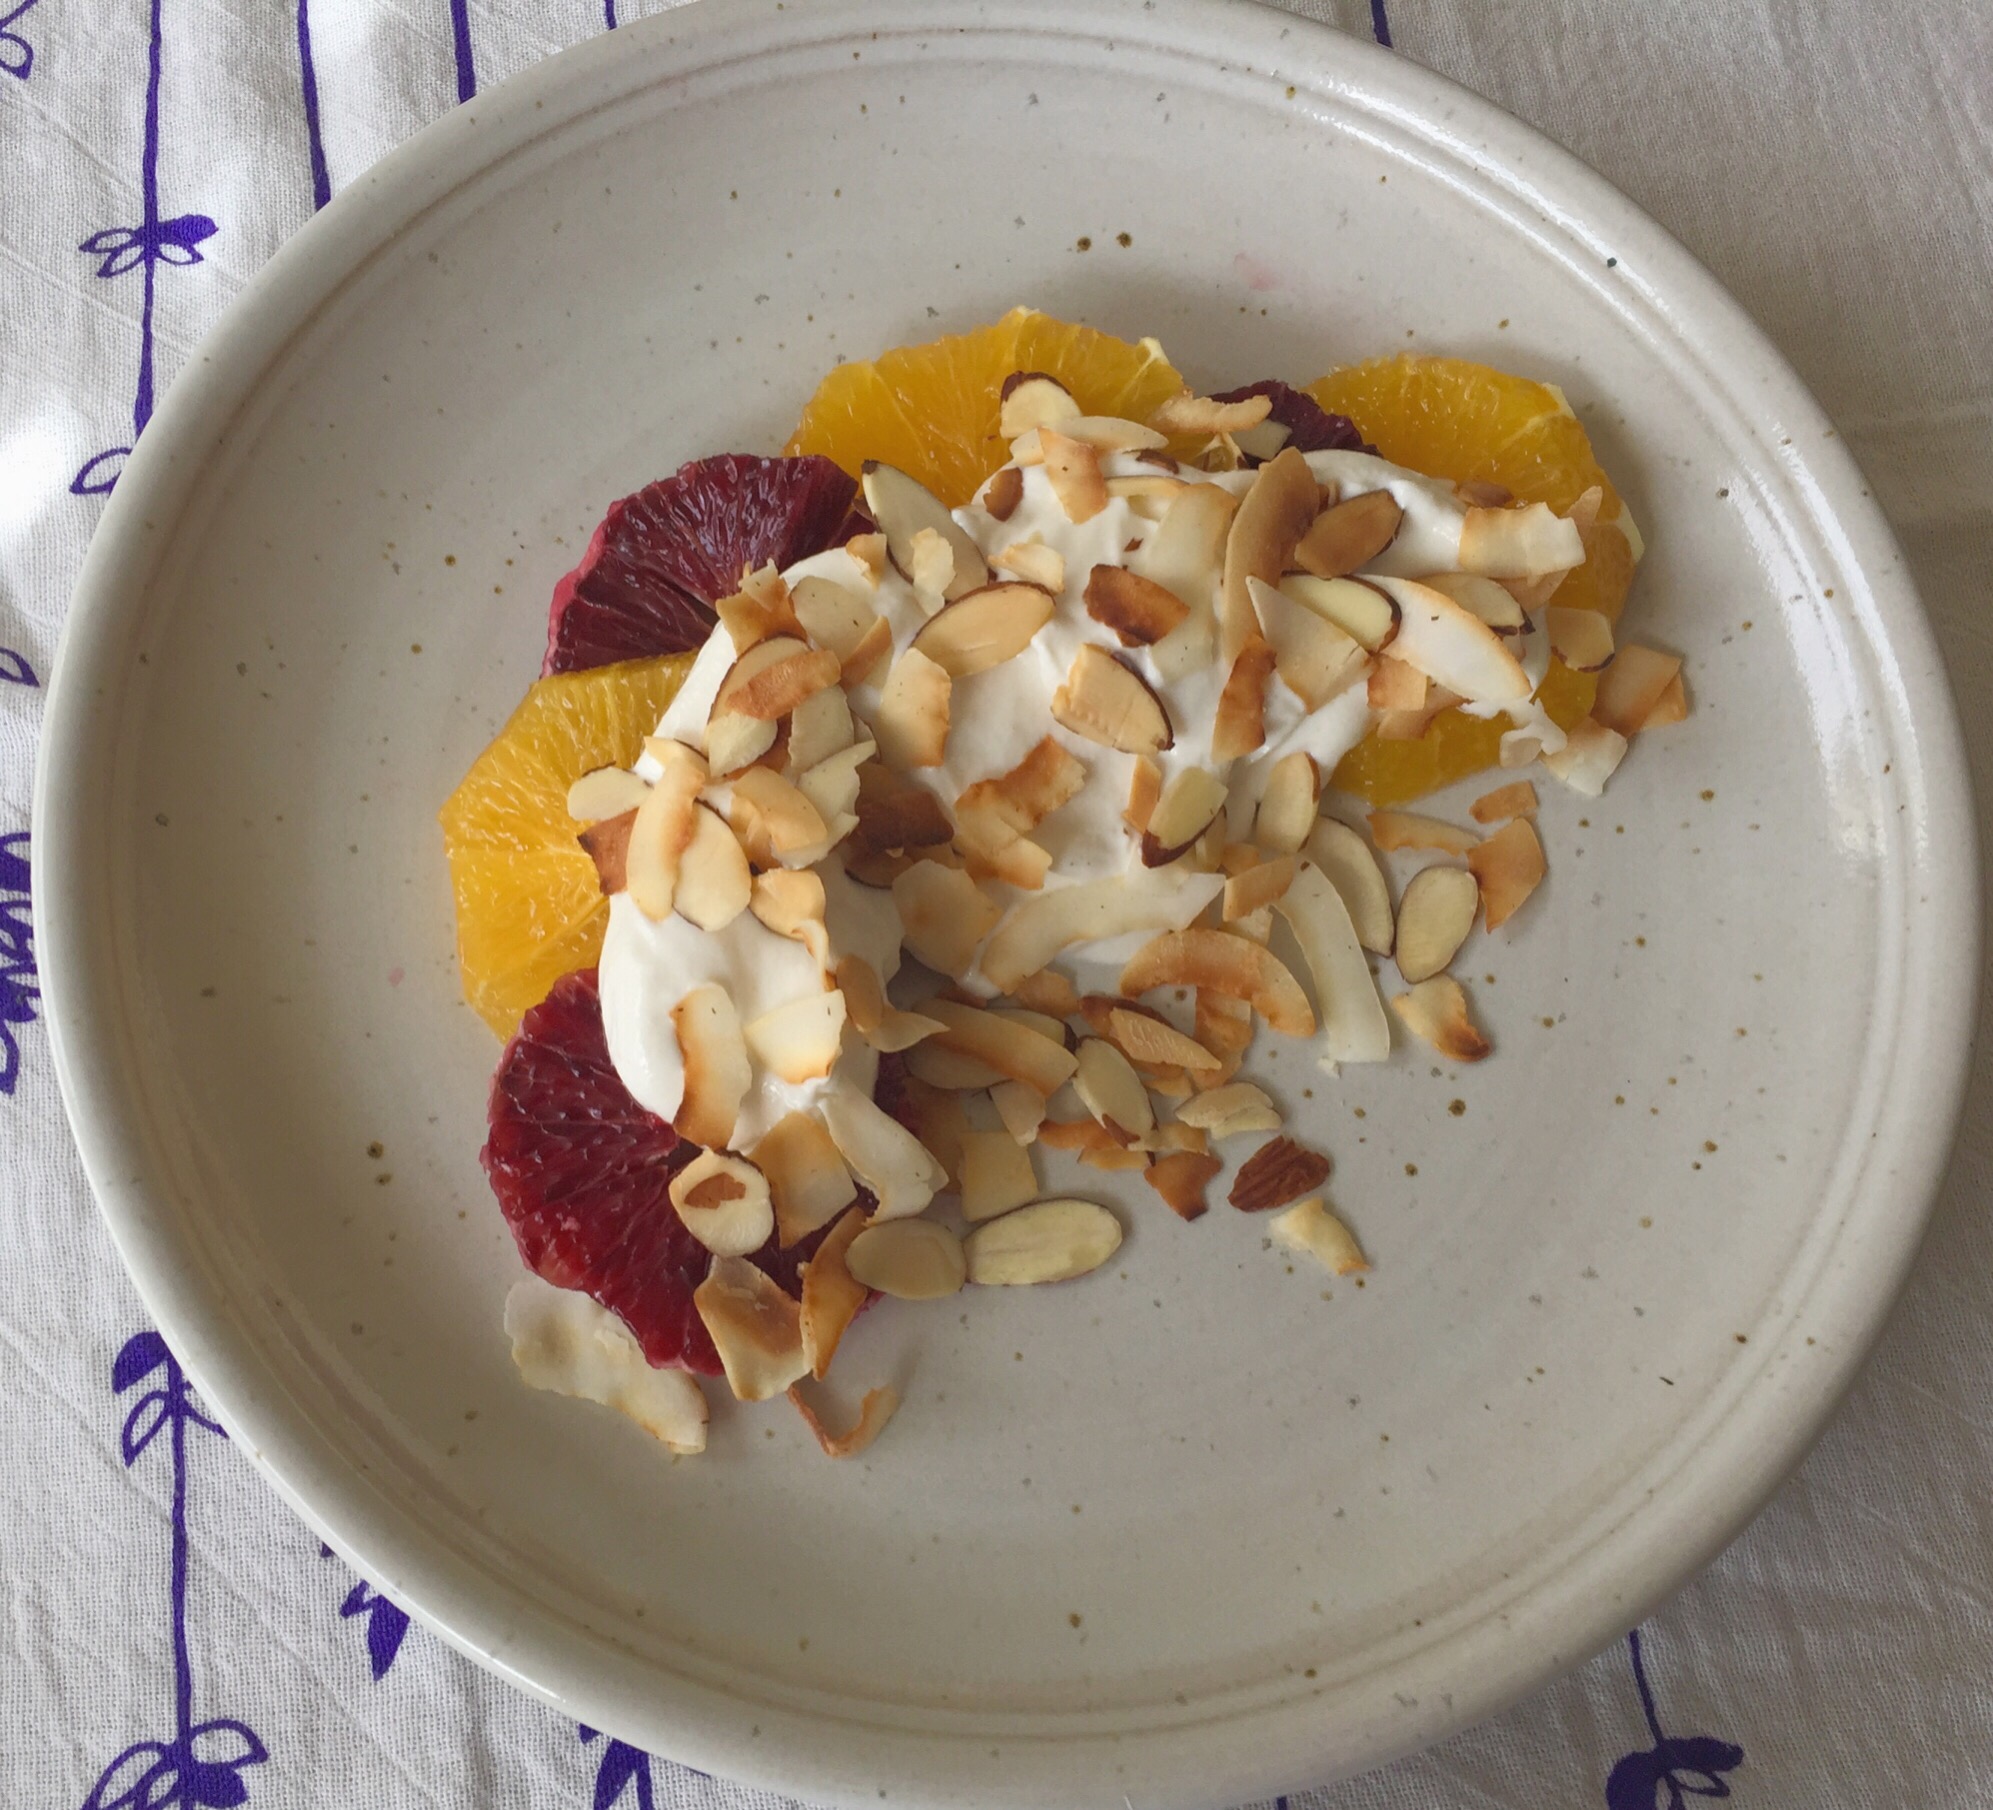
Now the only decision you need to make is whether to have dessert for breakfast.


March Balance: Busy Does Not Equal Important

I skipped February, so my March Balance post is closely taken from a blog I wrote for my day-job about one of the reasons I found meditation.

In modern culture, we seem to idolize being busy. How many times have you answered: “How are you doing?” with “Busy” (or some variation of it), with the subconscious hope that you one-up the other person with your importance and irreplaceability. By being “busy” we think we’ll make a mark on society and be remembered. “Busy” has become synonymous with important; yet how silly would we sound if we answered, “How are you doing?” with “Important”?

I used to worship in the Cult of Busy, and admit I am a recovering busy addict who has slip-ups like anyone else. My worship of busy started as a way to relieve stress and cope with other issues. I always needed to be doing or involved in something. I always needed to keep my mind and body occupied. And for the most part I was happy — or thought I was. Yet, I would become irritable and frustrated whenever I had to sit something out. I’d think, “What was I going to do with those new hours of my time?!” or “How was I going to make my mark to be greatly remembered and continue being important!?”

I didn’t intentionally search out meditation as a solution (if I had I would have probably only done the productivity meditations, lol). I started to find meditation in running. Although it was also a way to be busy, I could allow my mind to wander and regenerate. Letting thoughts run out with each foot fall and pound of the pavement. In grad school after some injury, I began to take a closer look at yoga and attended lunch-time classes with a friend. While I liked how my muscles felt longer and stronger after each session, the Savasana at the end where we laid on our mats for 5-10 minutes didn’t hurt either. I found a group of like-minded spiritual people with whom discussion could be shared about creating and sending more positive energy into the universe. It was here that I really learned to be ok with my introverted, introspective nature and use it as a powerful tool to heal my destructive thoughts.

After saying “yes” to too many things, being near burnout, and suffering an illness that forced me to rest and sit more things out, I began to see just how useless “busy” was. I noticed I wasn’t even paying attention to the present and was always steps ahead in planning for the future, but never enjoying it when it came. I began to focus more on mindfulness and my relationships improved, I felt mentally clearer, and relaxed enough to know what was and was not within my control (but that’s another topic for another day). I began to lose interest in being “important and remembered” at least in the sense of grandeur and instead chose to find balance and enjoyment in life. If I was always striving to achieve something in the future, how could I actually make an impact on the present?

Even this January, I pulled myself back again to recognize what instances was I taking on too much, when was I using “busy” as an excuse when something really just wasn’t a priority at the moment (and internally recognize that), and what my overall long term goals are – and reprioritize to help get there… making those steps in the present that can influence my future paths.

Far more people remember our actions and how we make them feel than what we said or how much we did. I’ve made a vow to make a continuous effort to slow down and live in the now, even if it’s only five minutes a day to sit and practice mindful meditation. It’s always a challenge and will forever be a fight against the flow of the Cult of Busy, but it will ultimately end in a better quality of life.

Namaste.


Hold-the-Sugar Date Bars

As recently as a few year ago, you couldn’t get me to eat dates for anything. They are one of my dad’s favorite fruits for baked products (cookies mainly) and growing up I remember finding the stash of dates hidden back in a cupboard and wondering why my mom had a package of wrapped cockroaches? Yay, I thought dates were pretty gross looking and therefore could not taste good. Well, here I am eating my words and they taste deliciously like dates. Although I didn’t immediately warm up to anything dates (I still think dates in smoothies is just too sweet), I think the first time thinking “they’re not so bad” is when I had them in wrapped in bacon and stuffed with blue cheese. Holy yum. I will take that on any menu please.

 I eventually started experimenting with trying dates in other forms and just recently was turned on to date bars when a we had a catered lunch for an event and the caterer brought date bars as an extra. After one bite I knew I needed to learn to make my own. I modified this recipe from a standard date bar recipe, but held out a portion of the sugar because the dates really are sweet enough on their own. 

Hold-the-Sugar Date Bars

Makes 36 bars

Ingredients

Date Filling

  • 3 cups chopped pitted dates (1 lb)
  • 1 cup water

Bars

  • 3/4 cup packed brown sugar
  • 1 cup butter or margarine, softened
  • 1 1/2 cups whole wheat flour
  • 1 1/2 cups oats (I used old fashion, but quick would also work)
  • 1/2tsp baking soda
  • 1/2 tsp salt

Directions

  1. Pit dates if not already pitted. Then finely chop in a food processor. 
  2. In 2-quart saucepan, cook dates and water over low heat about 10 minutes, stirring constantly, until thickened. Cool 5 minutes.
  3. Heat oven to 400°F. Spray bottom and sides of a 13×9 pan with non-stick cooking spray. 
  4. In large bowl, cut the butter into the brown sugar with a pastry blender until well mixed. Cut in flour, oats, baking soda and salt until crumbly (you may want to switch to a large spoon if needed). Press half of the crumb mixture evenly in bottom of pan. Spread with filling. Top with remaining crumb mixture; press lightly.
  5. Bake 25 to 30 minutes or until light brown. Cool 5 minutes in pan on cooling rack. Cut into 6 rows by 6 rows.

These bars are great for a quick snack and keep great in the freezer. I typically make a large pan, cut them up, and then freeze so I can take one out at a time and not be tempted by the whole pan sitting on the counter.

  
Enjoy!


Review of Hello Fresh

I paid for my Hello Fresh box and have not received any compensation for my review or opinions.

After receiving a few Blue Apron boxes and having a great experience, I was really excited to try Hello Fresh. I initially tried Hello Fresh through a Groupon offer for half off your first box, so I signed up to try the vegetarian box offerings.
  
My first box arrived on a past Thursday evening. Opening the box I immediately noticed the neat packaging… and also the box didn’t seem “refrigeration” cool, but quickly forgot about it as I stashed the boxes in the fridge. Mid-day that Saturday I decided to make the mushroom risotto because it sounded delicious! After pulling out the ingredients I noticed, uh oh, MOLD growing on my mushrooms – which I had never actually seen happen before. Pretty bummed, I picked out any non-contaminated pieces – basically only the baby portabellas were safe.    I chopped up the few mushrooms and continued to prep, noticing the incredibly limp single stalk of celery – oh well I guess it’s going to be cooked anyway? After everything was cooked the flavor was good, but I couldn’t really get over the fact that less than 48 hours after arriving on my doorstep, the ingredients weren’t fresh – despite the company name.

 
We later tried the Sunchoke Salad – which was good and flavorful, but just not what I expect to get from paying $10/plate. C made this in to his tiny side. It was good for me, but still didn’t contain sufficient protein (in my opinion) to be considered a meal.

 
The penne squash mac & cheese was good – slightly dry, but this was something I’ve already made on my own and the diced squash had a lightly sour acidic smell – which I ignored because it was going to be cooked, but didn’t add to my feeling that the food I received was less than fresh ingredients.

 
Since it was my first box, I decided to give it another shot and received another box – and I wish I could say that something changed my opinion, but sadly it was more of the same – no mold, but I still found the refrigeration quality of the box to be lacking. And while the small white meal ingredient packed boxes look neat and pretty, they are not functional for proper storage of ingredients – leaves and greens crushed under heavier items and varying moisture requirements all add to the faster degradation in quality.

While the flavors and recipes were good, I decided to discontinue by subscription until I feel some of the packing and refrigeration issues can be sorted out for a desert delivery (especially in the summer!).

All in all I was really hopeful I would like this product – especially since they have a dietitian on their recipe staff, but all the favors, nutrition, and recipe innovation can’t make up for ingredient products that loose their integrity so quickly. 

Maybe it’s time to get back to my own dinner recipe testing?


Mini Almond Pear Cakes (Gluten free and birthday friendly)

Ok… Only took a month to share this recipe from my birthday at the end of January. Since February is short, I’m counting this as a win it got done within a month.  I found this recipe on Pinterest from Mama’s Gotta Bake. It was on my “too bake” list for forever and after purchasing some mini spring form pans, I finally decided that now was the time. I altered the recipe slightly for the different pan size and some altitude. Since C and I were the only ones sharing in this dessert, I didn’t feel that I needed a giant cake to celebrate and these mini cakes worked perfectly for two people sharing one.


I seriously can’t get over how in love I am with how these beauties turned out.


Mini Almond Pear Cakes

Make 3-mini cake (serves 6)

Ingredients

  • 3 pears, any kind, 1.5 for batter 1 for topping
  • 1 scant cup sugar plus additional 2 tsp
  • 1/2 Tfresh lemon juice
  • 1 1/2 cups plus 2 T ground almond meal
  • 4 large eggs, room temp
  • 1/2 tsp, plus additional 1/4 teaspoon pure vanilla extract
  • 1 tablespoon honey
  • 1 tablespoon neutral tasting oil (like canola or grape seed)
  • 1/4 cup sliced almonds
  • Powdered sugar for dusting

Directions

  1. Preheat the oven to 350 degrees F, and place the rack in the center position. Spray mini spring form pans with non stick cooking spray.
  2. I used Anjou and Bosc pears, but any firm ripe pear will work (make sure they’re actually ripe – I had a pear that just didn’t want to soften while cooking). Peel and core two pears and then roughly chop them, since you’re only using 1 1/2 for the cake portion, you can snack on the other half while you bake.  Place the chopped pears into a small saucepan and add the lemon juice and 2 teaspoons of sugar. Cook the pears over medium heat in the covered pan for 10 minutes. Let cool. When cooled, mash the pears with a fork into a coarse puree. You can also use a food processor if the pears are still a little firm.
  3. Place the almond meal and 1 scant cup sugar in the bowl of a large food processor, and give it 5-6 long pulses. (This makes a large quantity of batter, so you’ll need a large food processor, not the mini kind). Add the eggs one at a time, along with 1/2 teaspoon of vanilla and the pear puree. Pulse until all ingredients are incorporated. You can use an electric mixer fitted with the paddle attachment if you don’t have a large enough food processor. Pour the batter into the spring form pans.
  4. Next, peel and core the last pear and slice it into 1/4″ slices. In a medium skillet, heat the oil and the honey stirring until the mixture begins to bubble. Take the pan off the heat and stir in the 1/4 teaspoon of vanilla. Add the pear slices and toss gently to coat.
  5. Sprinkle the almonds over the top of the cake, and add the pear slices in a fan shape. Spoon the remaining sauce in the pan over the top of the cake. Bake for 40-45 minutes until the cakes begins to brown and when a toothpick inserted into the center comes out clean. Place some foil over the top for the last 10 minutes of baking if cakes are looking too brown.
  6. Let the cake cool in the pan for 30 minutes and then you can remove the sides. Transfer to a serving platter and sprinkle with powdered sugar.


Enjoy!!


Blue Apron Review

I’ve been wanting to try Blue Apron for a while now. Especially since there’s a plug/ad for it during every How Stuff Works podcast episode. …does anyone else love the podcasts where you learn random stuff? My current favorites are TED Talks from NPR and How Stuff Works. I actually trained for last fall’s marathon relay listening to them – totally thought I would always and only be a music run person, but I guess I’ve changed. Any way, back to the foods. After being so uninspired with cooking lately, I finally just bit the bullet and ordered my first box (and dumbly didn’t use the STUFF code for a free box – total fail).  Whatever I guess, it was worth it. 

 The Friday before my birthday we got our first box. I hadn’t requested vegetarian, but selected no beef, so everything that week came vegetarian. …Apparently all the meals that week contained beef? Can I get a discount for that mistake? C was not entirely thrilled with there being no meat options, so he bought steaks to cook with each dish. With the exception of salt, pepper, and water, everything you need for the meal (including measured to the correct quantities) is included in the box – I love not having leftover waste! The recipes were really easy to put together and look amazing when they’re all done.  


The first dish we tried was the lemon linguine. I thought it was delicious, and although it says serves two… It’s definitely two very large portions – like one and a half Ingrid sized portions and one C sized portions. If you’re looking to use this as a weight loss tool – it’s definitely not, unless you adjust portions slightly.   


Our second meal was the Tuscan Ribollita – basically bean stew with French bread cooking in, topped with a soft boiled egg.  Only one note – timing soft boiled eggs at high altitude if different than at sea level – we ended up with some runny white (which I abhor) the first time around. Adding about 30 second seemed to do the trick. 

I had forgotten how delicious runny yoke over stew, pasta, or polenta could be – still not a sunny side up or over easy girl though (weird, I don’t like just fried eggs). 

 
Last of the week was a stuffed squash – I loved the warm farro salad so much I made it again the following week and threw it over kale. 

After skipping a week, none of the meals really struck my fancy for that particular week, another box arrived in the mail.   


The first meal was chicken, mashed potatoes, and glazed carrots – which apparently I failed to get a picture of (but it was incredibly tasty, if not very simple and easy to replicate).  Second was the blacked salmon with black rice citrus salad – another winner in my book! 

  
And last but not least, tonight we made beet linguine tossed with onion and Swiss chard and topped with walnuts and goat cheese. Yum!!

After two weeks of delicious food, I think I’ll probably keep going with the membership, although probably not every week – because I do like to experiment with my own recipes as well. Final review – delicious food, easy to make, convenient, and more cost effective than going out to eat. One aspect I love is that even if you skip a week, you still have access to the recipes and can make items on your own – you’ll just have to do the shopping yourself. 

This type of meal service wins in my book!


Week of Food in Review (Food Ramblings)

Maybe this should be titled – week and a half in review? Because I’m starting at the beginning of my birthday weekend – Jan. 28th I was craving something healthy that would make my body feel not as sluggish as it had been the previous week – probably because I was completely exhausted. Any way – I pestered C until we went to Vineagrette for dinner. 🙂 I love their refreshing juices – I always get the Pepino (seltzer, lime, and cucumber?). 


 I got the Omega Salad with grilled tofu – yum! 
But some of my other favorites are the La Pepita and Eat Your Peas. 🙂
 Friday night I dug into my first Blue Apron box – more on that to come. 🙂 We made a Lemon Linguine – I thought is was fantastic, but C still needed another meat to go with it. (Story of our cooking adventures – if there’s no meat it’s not a meal.) Sigh. 


Saturday night we went out to celebrate my birthday (since it was on Sunday). We went to Artichoke Cafe, which is always one of my favorites. I ordered chicken on a bed of sweet potato polenta with Brussels sprouts and cranberry glaze. The chicken was great, but if I’m perfectly honest, I usually decide my meal based on the sides.  Sweet potato polenta – yes please. We also got ice cream for dessert, but I was too full to snap a picture – vanilla and rosemary ice cream. Delicioius.  

Sunday morning I made breakfast sandwich with an aged cheddar and green chili spread, eggs, and tomato on an English muffin. Then decided to take the day easy with a bunch of baking! I made cake, gluten free almond pear mini cakes, which I used as my birthday treat along with some organs cranberry muffins (not pictured because despite tasting good, they really were not the beauties I was anticipating.    

 Sunday night we tried out another Blue Apron meal (which I actually made a second time sans the squash and brought for lunch). A farro salad in roasted squash and then a ribollita on Tuesday. Basically a fantastic week for food.  I’ll be sure to write up a review about the whole experience after the next box of goodies.   

 And now I realize that I have rambled about nothing but food. Oh well. I’m perfectly ok with that. 

Onwards and upwards. Cheers to another year older and less than one to 30. 


My Favorite Morning Glory Muffins

When I was younger my mom would make some of these muffins and I remember barely tolerating them…. Instead I opted for the chocolate chip or banana, which are still tasty, but now I find that the more I can pack into a muffin, the more I like it. I love Morning Glory Muffins for grabbing before I hit the gym in the morning. If I haven’t had at least a little something to eat right when I wake up I feel nauseous and light headed. Rather than opting for straight sweetness these have some sticking power – fiber in the carrots and pineapples, some protein in the yogurt and nuts, and also the health fats from walnuts. Another power packed go-to that doesn’t break the calorie bank.

Remember that these are baked at high altitude, so down as sea level the flour level may need to be adjusted slightly to get the consistency you want.  

Morning Glory Muffins

Makes about 12-15 muffins

Ingredients

  • 1 cup whole wheat flour
  • 1/2 cup all-purpose flour (add more if batter is too runny)
  • 3/4 cup packed brown sugar (can use 1/2 cup to cut back on sugar)
  • 1/2 cup oats
  • 1 T ground cinnamon
  • 2 tsp baking soda
  • 1/2 tsp salt
  • 1/2 tsp ginger
  • 2 cups grated carrots – about 4 large carrots
  • 1 grated apple (no core)
  • 3/4 cup crushed pineapple, drained
  • 1/2 cup plain fat-free yogurt
  • 3 eggs
  • 1/3 cup oil
  • 1/2 cup chopped walnuts
  • 1/2 cup raisins

Directions

  1. Preheat over to 350F. Line the muffle tin with liners and spray with non stick cooking spray. This is important or your muffins will stick to the paper.
  2. In a small bowl, cover raising with hot water and set aside to soak.
  3. In a large bowl, whisk together flour, sugar, soda, spices, and salt.
  4. Stir in carrots, Apple, pineapple, nuts, and oats.
  5. In a separate bowl, beat eggs, oil, and yogurt. Add to flour/fruit & vegetable mixture.
  6. Drain raisins and add to the rest of ingredients.
  7. Spoon batter into muffin liners about 2/3 full.
  8. Bake at 350F for 25-28 minutes or until a toothpick comes out clean and the tops are springy to the touch.
  9. remove from oven and let cool at least 5 minutes.

These freeze incredibly well, so I like to keep them in the freezer and just pull one out at a time in the morning. 🙂


 Now go make these for the weekend!

Enjoy!!